About Samsung Galaxy M51
Samsung is the most growing multinational smartphone company and has overcome almost the whole market of Indian Smartphones. Nowadays, if we talk about the smartphone brand which sold the largest number of products till now, Samsung will stay at the 1st rank. So Samsung is about to launch one of its exceptional inventions – Samsung M51. This phone got this much because of its long-lasting battery life of total 7000mAH, and as well as it’ll be the best smartphone in the whole Samsung M series.
In terms of screen size and display, Samsung never had misled you with any of its contrivances since Samsung 2 was the first phone for providing Super AMOLED display in just 7,999.00 INR. So the Samsung M51 is featured with a 6.7-inch sAMOLED Plus Infinity-O display and comes with 1080 x 2340 full HD resolution and as well as Corning Gorilla Glass 3 protection. If we talk about the backside design, M51 comes with the dust resistive plastic body which beautifies its look to the supreme level.
Are you a Gaming freak, and looking for a performative and long-lasting battery device? If yes, then you can choose the Samsung Galaxy M51 since it’s enclosed with the Qualcomm Snapdragon 730G chipset octa-core processor and Adreno 618 GPU which will dazzle your phone’s performance to an ultimate level. Moreover, it’s India’s first 7000mAH battery power smartphone which comes with the fastest 25W charging support. Also, it can work as the reverse charger for charging your other phone.
Furthermore, the Samsung M51 is the first M series phone to accommodate the 64MP segment-leading quad rear camera setup. Basically, this device isn’t launched yet, so most of these specifications are based on some rumours. The launching date of Samsung M51 is 10 September 2020, and as per the reports, Samsung is launching the M51 in two different colours, Black and Dark Blue.
Steps to Root Samsung Galaxy M51
Below I have shown step by step procedure to Root Samsung Galaxy M51. You have to follow every step carefully, or else you may face trouble booting up your device again.

Please read the complete guide before applying the steps. This will avoid confusion.
Things to remember
- Make sure to disable all security Locks on your Samsung Galaxy M51.
- Take Full Backup of your Android device.
- You need a PC to perform the Commands.
- Fully charge your phone.
- Samsung Galaxy M51 Original USB Cable.
Note: Rooting is a complex process, so if you miss any of the below steps will end up bricking your device. So, make sure to follow all the steps carefully as shown.
We are not responsible for any loss and damage to your device. Apply the below steps with your own risk.
Step 1: Unlock Bootloader on Samsung Galaxy M51
- First, we need to enable Developer Options on Samsung Galaxy M51.
- Go to “Settings” on your Samsung Galaxy M51.
- Scroll down to the very bottom of the screen and select “About phone.”
- Next, select “Software information.”
- Tap on the “Build number” 5-6 times.
- Enter your phone’s lock screen PIN/Password/Pattern if prompted.
- You will now see the
"Developer mode has been enabled!"toast message on the screen.
- The next thing we need to enable is the OEM unlocking option on Samsung Galaxy M51.
- Again head over to Settings → Developer options → toggle ON the OEM unlocking option.
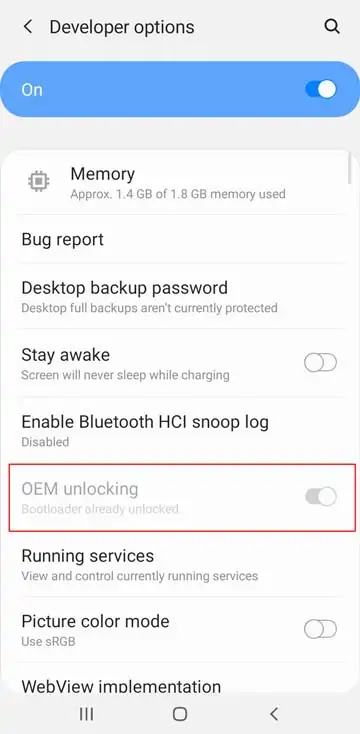
- Next select “Enable” when prompted to confirm.
- Again head over to Settings → Developer options → toggle ON the OEM unlocking option.
- Now we are ready to Unlock Bootloader on your Samsung Galaxy M51.
- First, power off your Samsung Galaxy M51 smartphone.
- Connect your phone to the PC while holding the Volume Down + Volume Up keys together until you see the bootloader screen.
- Now press Volume Up key to enter “Device unlock mode.”
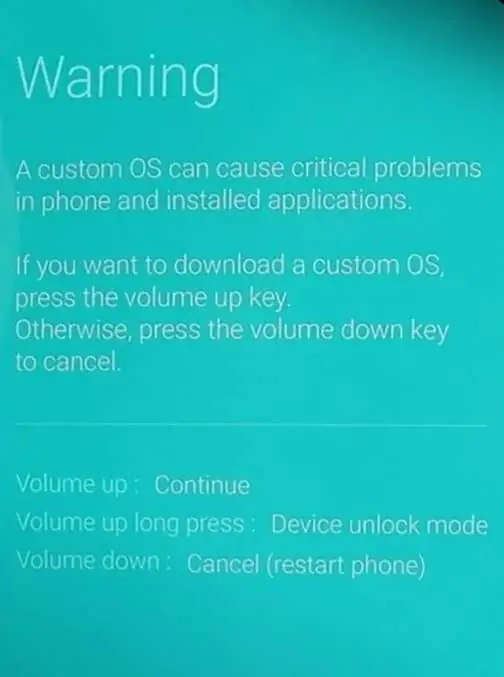
- Again press Volume Up key to confirm Bootloader Unlocking on Samsung Galaxy M51.
- Your device Bootloader is unlocked, and it should reboot automatically.
Downloads
In any steps, if the particular file is asked you to download, then you can come here and download it. We will update the links according to the latest build by developers.
- Download Magisk App (Latest Version) [Phone]
- Samsung USB Drivers (Optional) – Download [PC]
- Odin Flash Tool (Latest) – Download [PC]
- 7Zip-ZS (Latest) – Download [Install it]
- LZ4 – Download [PC] [Extract the Zip file]
Step 2: Download Stock Firmware for Samsung Galaxy M51
You can download Samsung stock firmware from various sources, but the huge problem is the Speed. By using the Frija tool, you can download stock firmware files at high speed.
- Download Latest Frija Tool.
- Extract the zip file to your windows desktop.
- Open the extracted folder and double-click on the
frija.exefile to launch the tool. - We need two things, first your phone’s model number and second, and CSC/regional code.
- You can get your phone model number by going to Settings → About phone.
- To view the CSC code, you can download “Phone Info SAM“ app.
- Once you have the above information, enter the required data in the Frija tool.
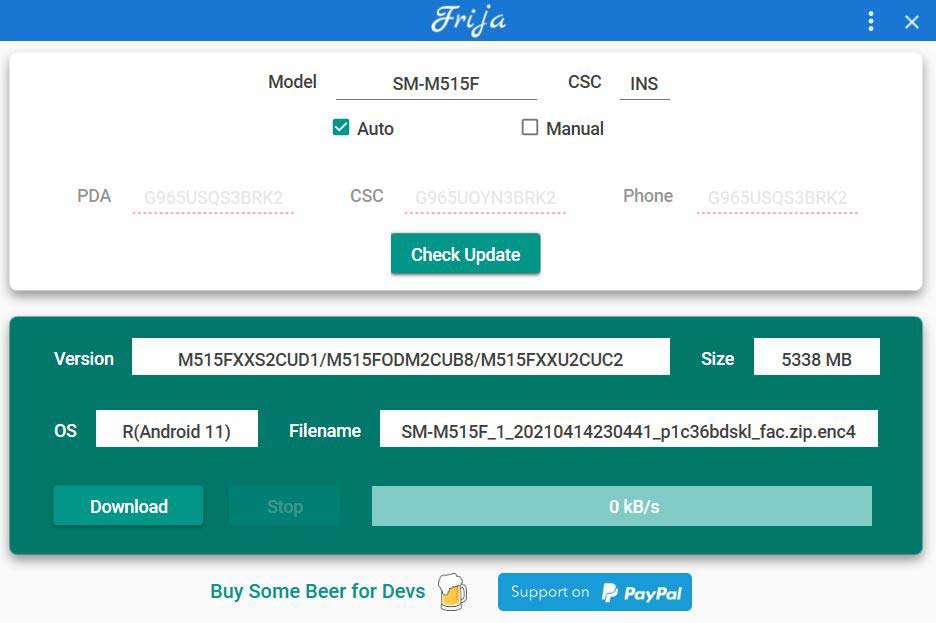
- Finally, click on the Download button.
Step 3: Preparing Patched Boot Image file
- Extract the downloaded firmware package on your PC.
- Open the extracted folder, you will see five firmware files in
.tar.md5format.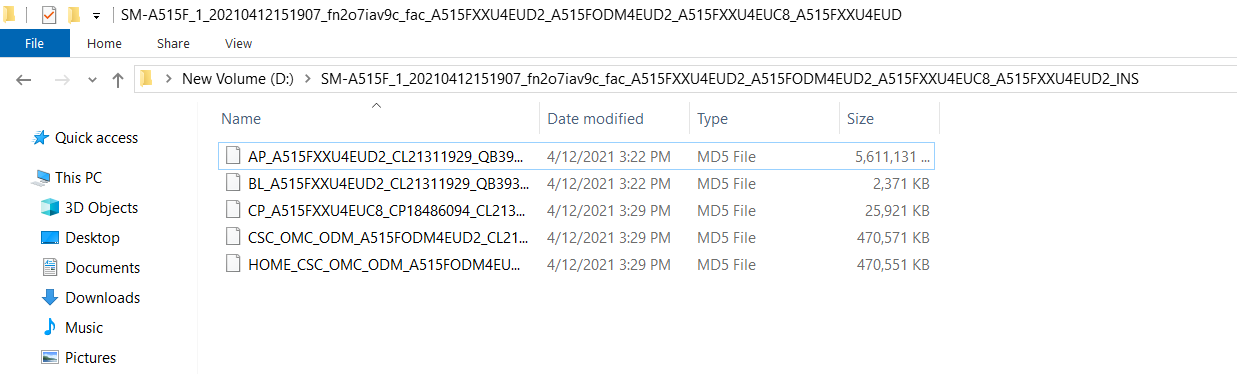
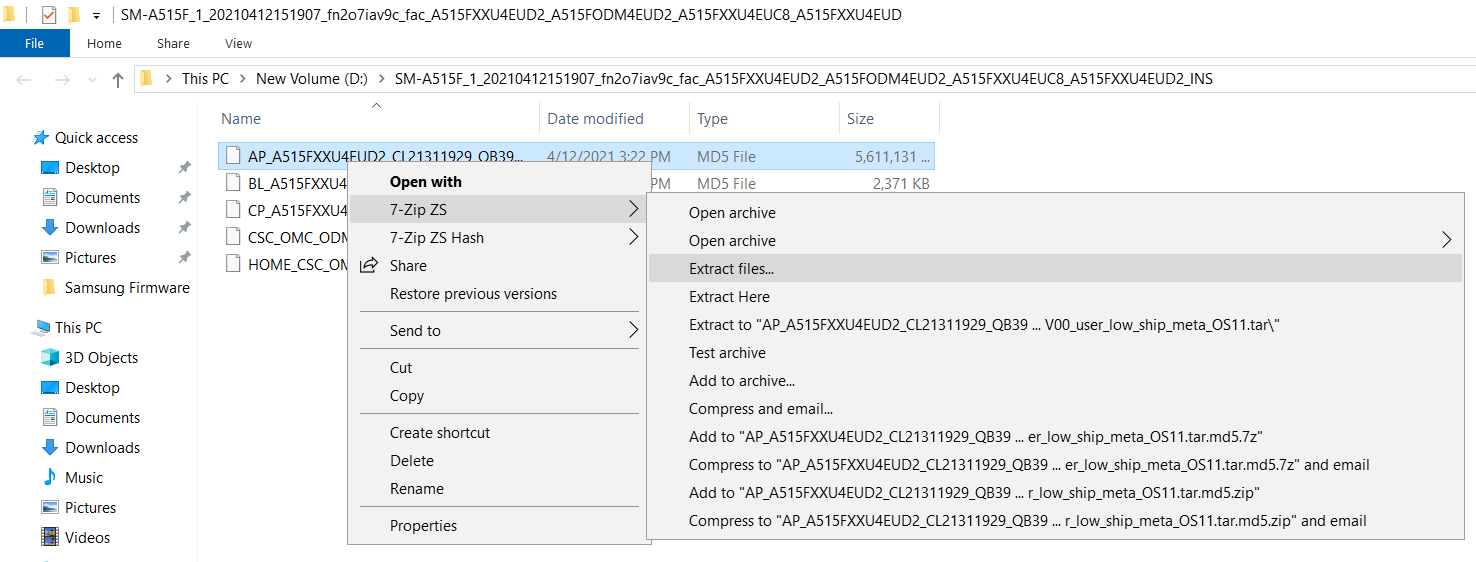
- Right-click on the AP firmware file, hover into the 7-Zip option and select Extract files.
- Now you will find several files along with the
boot.img.lz4,vbmeta.img.lz4, andvbmeta_samsung.img.lz4.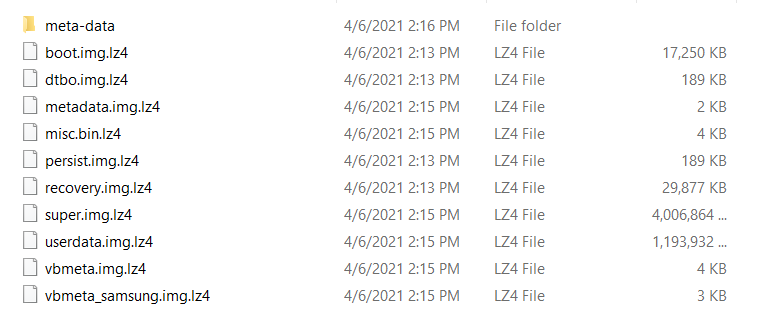
- Copy
boot.img.lz4,vbmeta.img.lz4, andvbmeta_samsung.img.lz4to LZ4 Installed folder.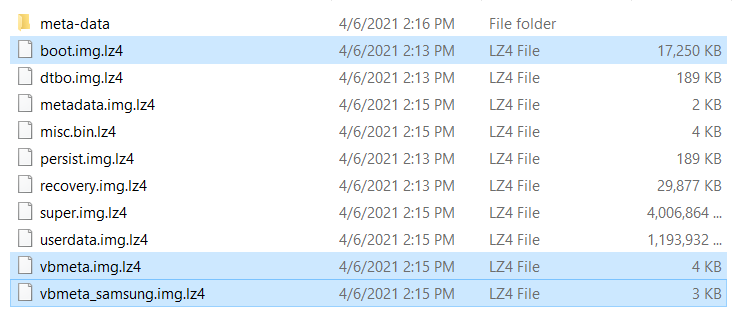
- Next we have to convert .img.lz4 to .img file. To do that, follow the below steps:
- Open the lz4 folder.
- Drag the .lz4 file to the lz4.exe program.
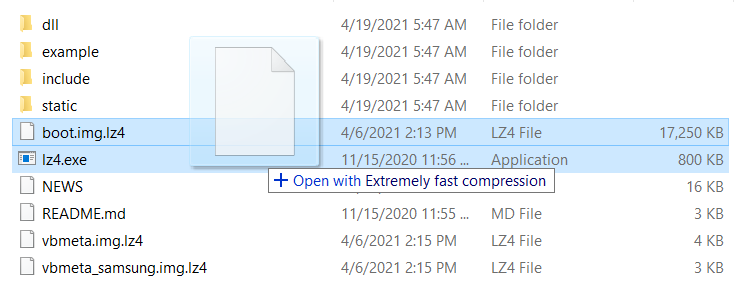
- The script will convert the file to .img format.
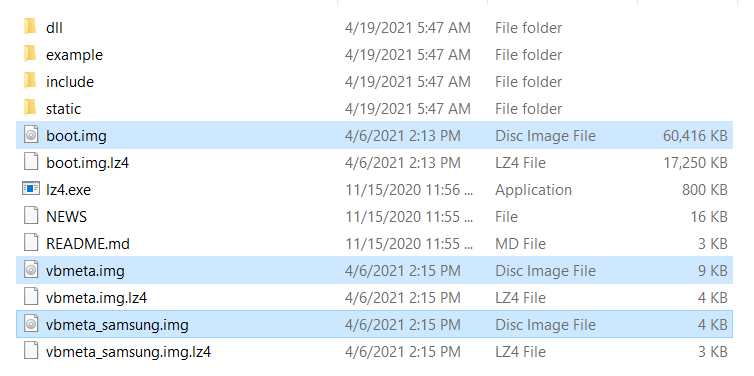
- You have to convert all three files one by one.
- Connect Samsung Galaxy M51 device to your PC/Laptop.
- Now copy the “AP” file from the Firmware folder to your phone’s internal storage.
- Now the next step you have to follow on your phone.
Step 4: Patch the AP Firmware File with Magisk App
- Download and install Magisk App on your phone.
- Open the Magisk app from the app drawer.
- Tap on the “INSTALL” button.
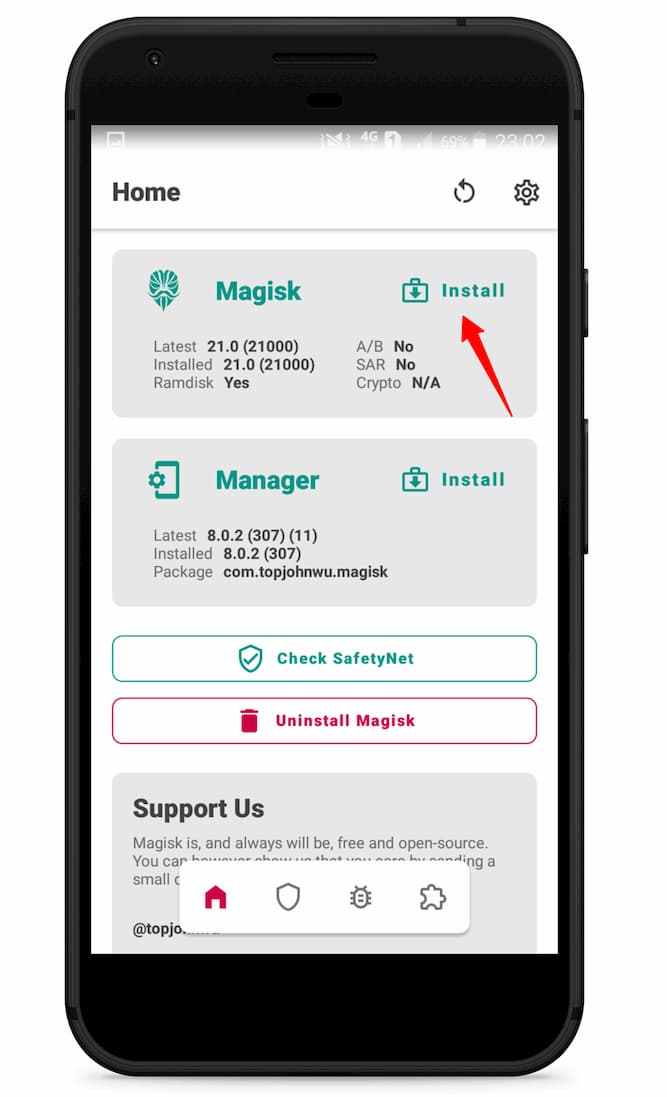
- Now here tap on the “Select and Patch a File.”
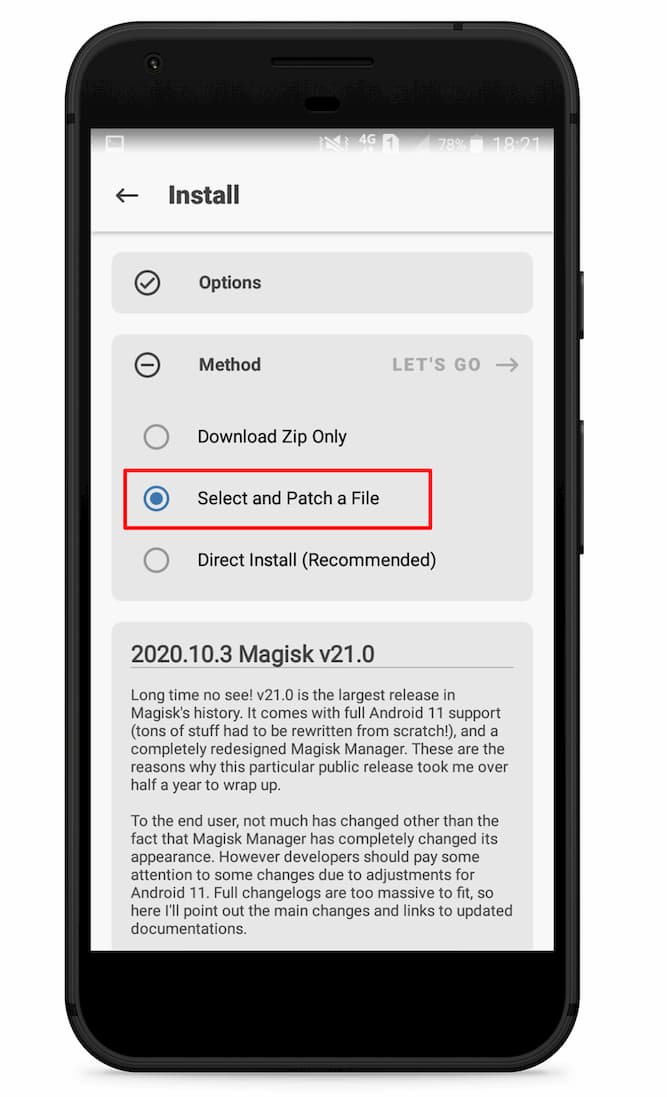
- Navigate to the internal storage and select the AP firmware file that you previously copied to the phone.
- Once the file is selected, tap on “LET’S GO.”
- Wait until Magisk patches the file.
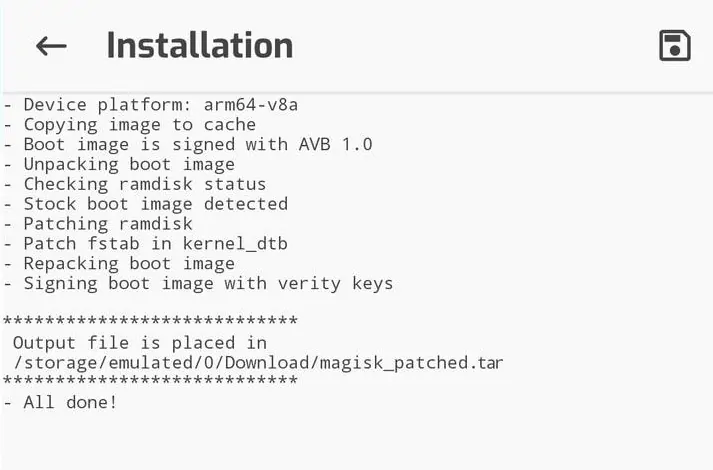
- The patched image file can be found in the “Downloads folder.”
- Now connect your phone to the PC and copy the
magisk_patched.tarfile to the “firmware folder” on your PC.
- Extract
magisk_patched.tarfile. - Now head over to the “LZ4 folder” and copy
vbmeta.imgandvbmeta_samsung.imgfile to Magisk Patched folder.
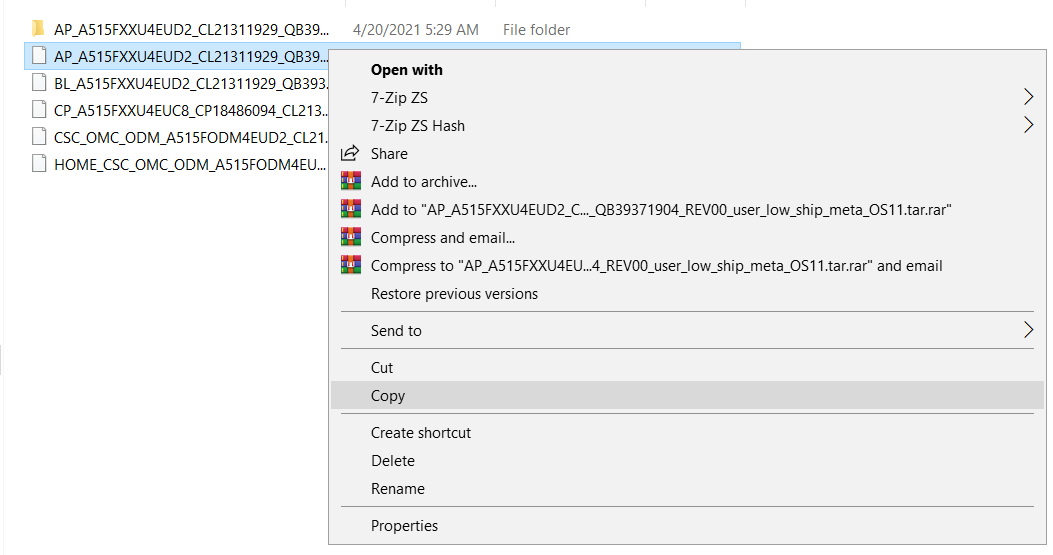
- Select
boot.img,vbmeta.imgandvbmeta_samsung.imgfile, right-click on the files, and “Add to archive.”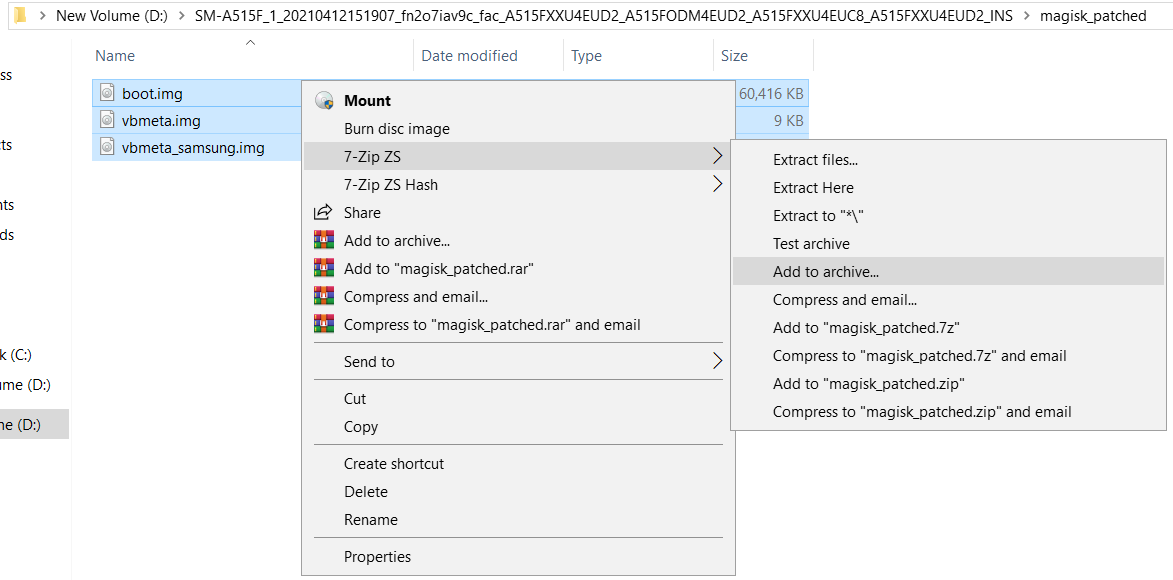
- Select the Archive format to tar and tap on ok.
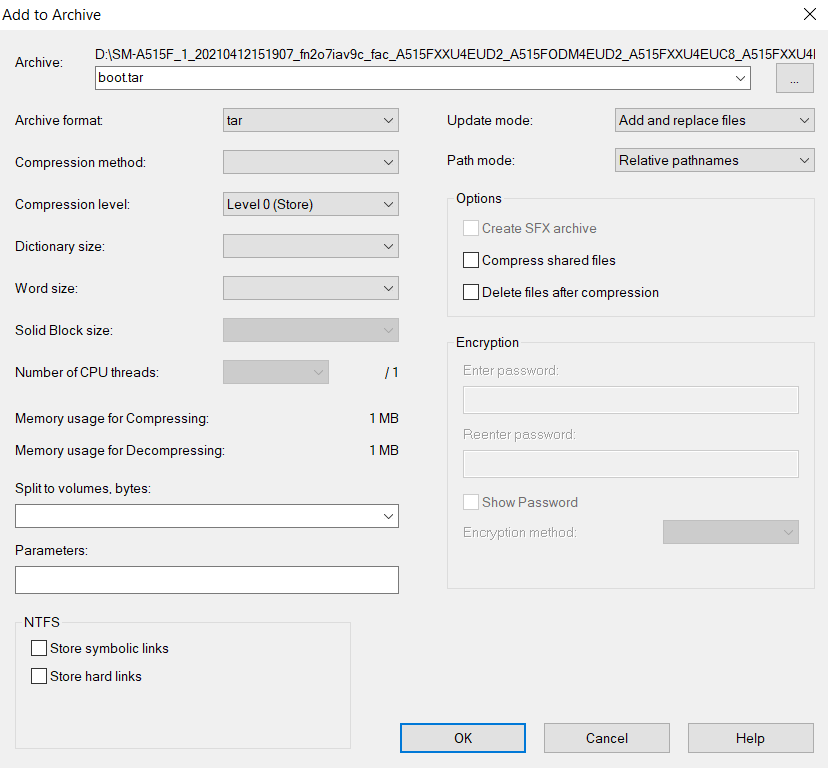
- Now you will see the boot.tar Odin flashable file.

Proceed to the next step.
Step 5: Boot your Samsung Galaxy M51 into Download Mode
- First, power off your Samsung Galaxy M51 device.
- Connect your smartphone to your PC while holding the Volume Down + Volume Up keys together.
- You will now see the Bootloader screen.

- Now press Volume Up key to enter Download Mode.
Step 6: Flash Patched Boot.tar using Odin flash tool
- First, extract the Odin zip file to your desktop.
- Open the extracted folder and run Odin3 xxx.exe file.
- Connect your Galaxy device to PC/Laptop.
- You will see
ID:COMsection light up blue. It means the PC successfully recognizes your phone.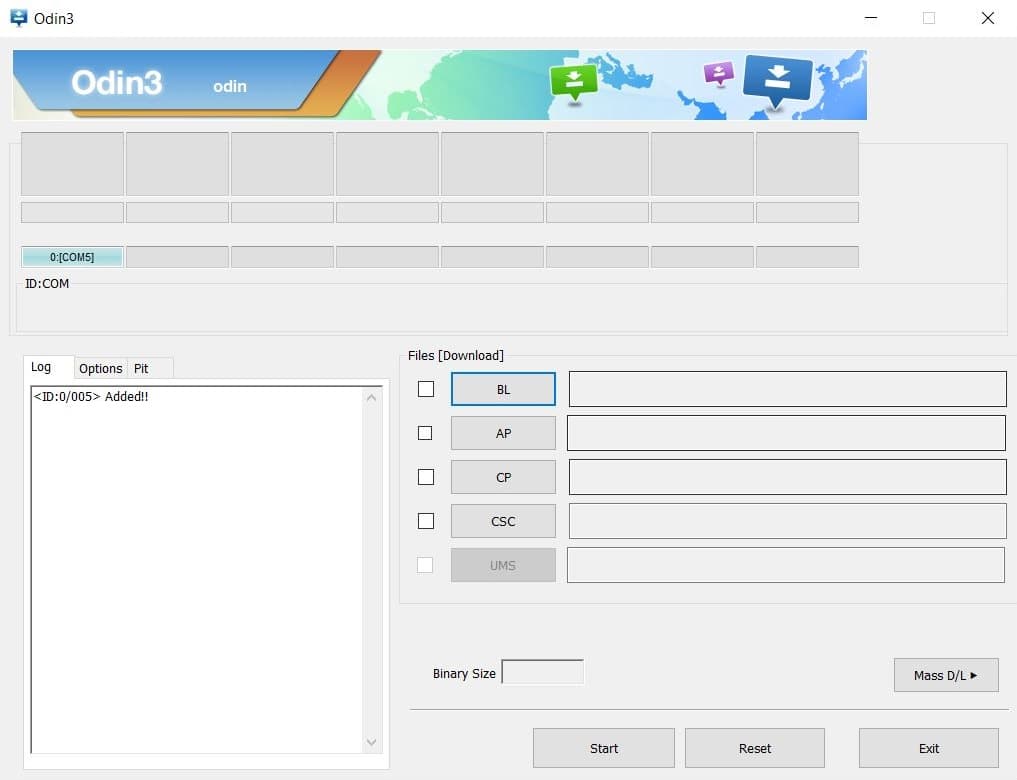
- Click on the following slot buttons and select the corresponding firmware files:
- Tip: For BL, CP, CSC you have to select files from the “firmware folder”. For AP you have to select the patched boot.tar file (Check Step 6, 14th step.)
- BL: Select the firmware file starting “BL”
- AP: Select the Patched AP firmware file (boot.tar)
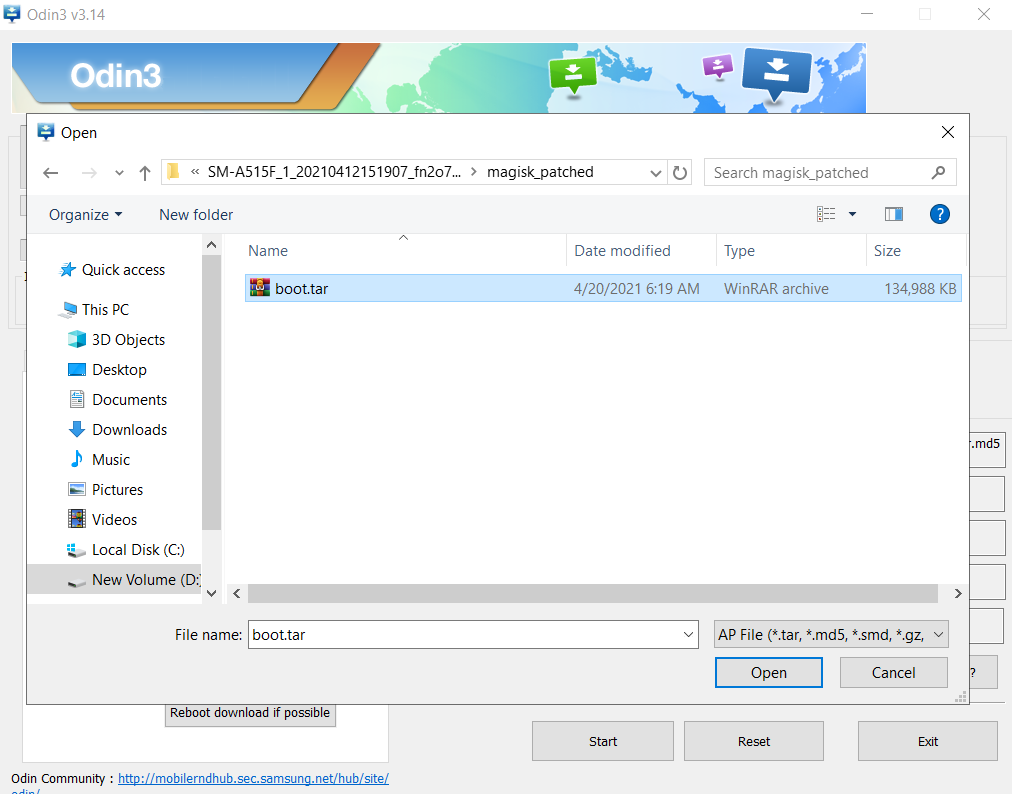
- CP: Select the firmware file starting “CP”
- CSC: Select the firmware file starting “HOME_CSC”
- Once all firmware files are loaded to the Odin tool.
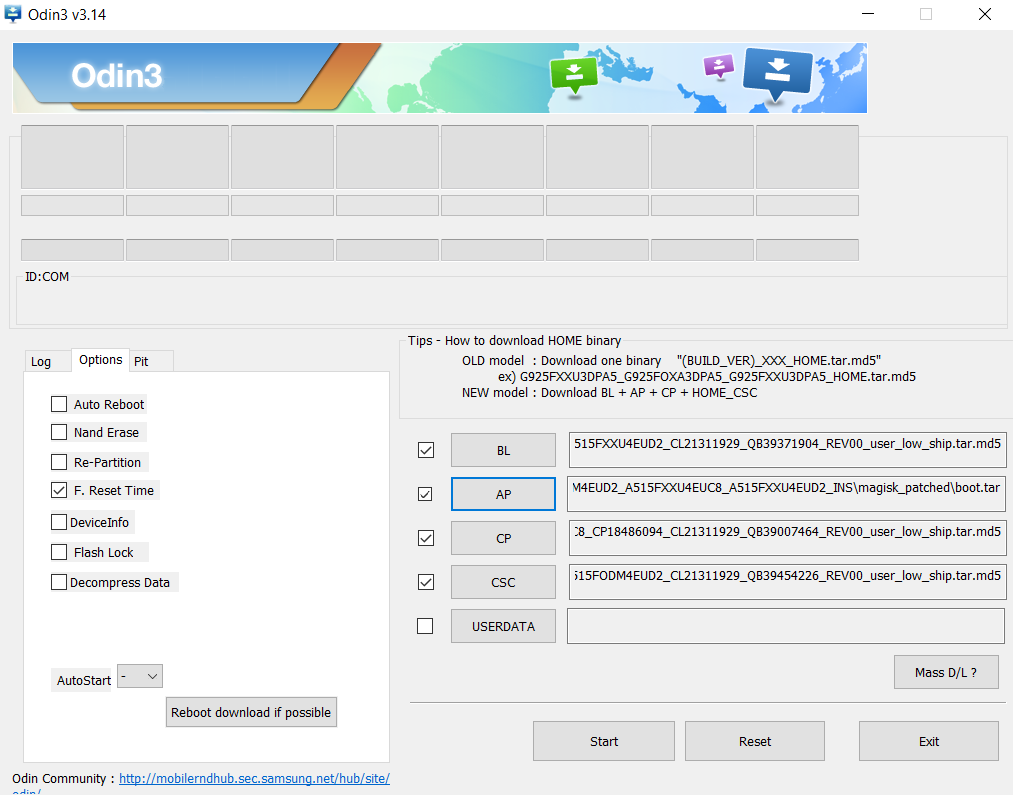
- Make sure to untick the Auto Reboot option under the “Options” tab.
- Once done finally, click “Start” to begin the flashing process.
- If the flashing is successful, you should see the PASS message on the Odin screen.

- Once the process completes, press the Volume Down + Power keys to exit Download mode.
- As soon as the screen goes black press the Volume Up + Volume Down + Power keys to boot into Recovery mode.
- Now once the Galaxy A51 boots into stock recovery mode follow the below steps.
- Go to Wipe data/factory reset. (Use Volume keys to navigate between the options and Power key to select an option.)
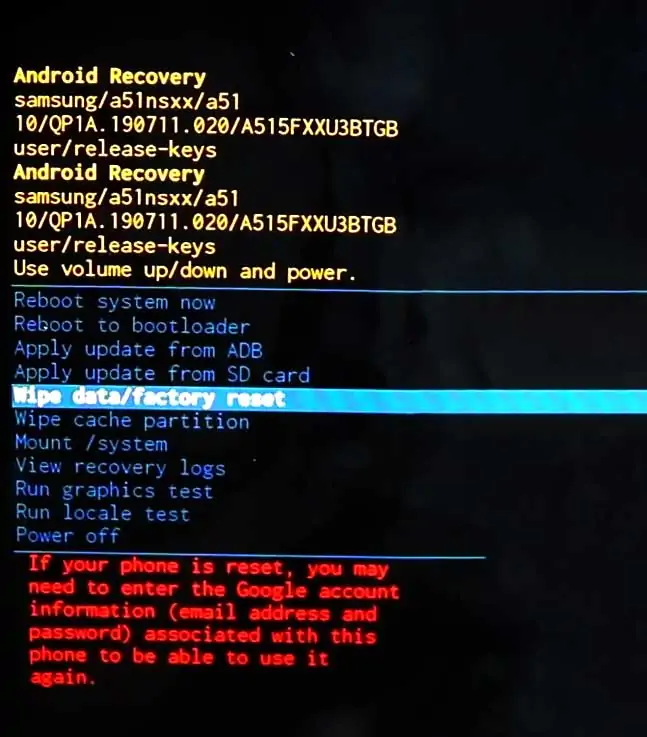
- Select “Factory data reset.”
- Once done select “Reboot system now.”
- Go to Wipe data/factory reset. (Use Volume keys to navigate between the options and Power key to select an option.)
- The first boot will take some time.
- That’s it! You have successfully rooted Samsung Galaxy M51 using Magisk.
You can also verify if your rooted Samsung Galaxy M51 passes SafetyNet by pressing the “Check SafetyNet” button in Magisk App.

After your device boots up, you will see Magisk App installed on your phone. This app will help you to manage Root permissions, install Magisk Modules, Magisk Hide, and other features
If you can’t see the app, simply download it from here.
[su_box title=”Related Articles” box_color=”#01B09B” radius=”0″]
- How to Root Samsung Galaxy S20 Plus
- Root Samsung Galaxy S21 Ultra with Magisk
- How to Root Samsung Galaxy A21s using Magisk
- Root Samsung Galaxy F41 using Magisk
- How to Root Samsung Galaxy S20 Plus using TWRP
[/su_box]
Wrapping Up –