As a Samsung Galaxy S20 Plus owner, you may be interested to know how to root your device. This article will discuss the benefits of rooting, what is required and how to root Galaxy S20 Plus with Magisk on Snapdragon or Exynos devices.
The process of rooting an Android phone can seem daunting at first glance. Still, it actually has many benefits, such as installing custom ROMs (less buggy than stock) and using apps that require root access like Titanium Backup, Xposed Framework, and Greenify, which are not available in the Play Store.
You can bypass carrier locks for international SIM cards, backup/restore system files from PC without using any type of cable or ADB commands, monitor CPU frequency and voltage usage in real-time with System Monitor.
Samsung Galaxy S20 Plus Specifications
Samsung is the most prominent Smartphone brand internationally and is trusted by billions of people. It manufactures all types of smartphones, from bar phones to highly configured Super Smartphones.
So today, we’re here reviewing one of the Super Smartphones manufactured by Samsung – Samsung S20 Plus. S stands for super-smart in Samsung S series, and as per the name, Samsung S20 Plus includes smart configurations such as Snapdragon 865 5G processor and 64MP more acute camera.
According to the design, Samsung S20 Plus is a premium smartphone since it comes in five different colors Cosmic Black, Cosmic Grey, Cloud Blue, Cloud White, Aura Red, and Aura Blue, which are all amazing in look.
For more beautifying your phone’s glimpse, Samsung has installed corning gorilla glass 6 body on both front and backside. Display-wise, it comes with a 6.7 inch Dynamic AMOLED 2X capacitive touchscreen which comes with 1440 x 3200 resolution, which can be measured as HDR10+.
The Samsung S20 Plus is made for professionalizing your look, and that’s why it has installed the rear camera on the upper left side in the standing-rectangle shape with having quad-camera equivalenting 12 + 64 + 12 + 0.3 MP.
This brilliant camera configuration will offer you Ultra Wide, Auto-HDR, panorama, and as well 8K video recording modes. On the front upper center side, Samsung S20 Plus has an embedded 10 MP punch hole Dual Pixel camera which features you with dual video call and Auto HDR.
For supplying you with the best performance on advanced battery life, The Samsung Snapdragon 865 5G 7nm+ octa-core processor won’t heat your device and let you play high-tech comfortably.
Samsung S20 Plus is executed with the 4500 mAH battery with the 25W fast-charging support for long-lasting life. Samsung is providing you with this all-rounder powerpack with five different colors in 8GB/128GB variant is launched globally.
Also read, How to Root Samsung Galaxy S20 using Magisk
Steps to Root Samsung Galaxy S20 Plus
Below I have shown a step-by-step procedure to Root Samsung Galaxy S20 Plus. You have to follow every step carefully, or else you may face trouble booting up your device again.
Please read the complete guide before applying the steps. This will avoid confusion.
Things to remember
- Make sure to disable all security Locks on your Samsung Galaxy S20 Plus.
- Take Full Backup of your Android device.
- You need a PC to perform the Commands.
- Fully charge your phone.
- Samsung Galaxy S20 Plus Original USB Cable.
Note: Rooting is a complex process, so if you miss any of the below steps will end up bricking your device. So, make sure to follow all the steps carefully as shown.
We are not responsible for any loss and damage to your device. Apply the below steps with your own risk.
Downloads
In any steps, if the particular file is asked you to download, then you can come here and download it. We will update the links according to the latest build by developers.
- Samsung USB Drivers (Optional) – Download [PC]
- Odin Flash Tool (Latest) – Download [PC]
- Samsung S20 Plus Encryption disabler.zip
- TWRP Recovery for Samsung Galaxy S20 Plus
Step 1: Unlock Bootloader on Samsung Galaxy S20 Plus
- First, we need to enable Developer Options on Samsung Galaxy S20 Plus.
- Go to “Settings” on your Samsung Galaxy S20 Plus.
- Scroll down to the very bottom of the screen and select “About phone.”
- Next, select “Software information.”
- Tap on the “Build number” 5-6 times.
- Enter your phone’s lock screen PIN/Password/Pattern if prompted.
- You will now see the
"Developer mode has been enabled!"toast message on the screen.
- The next thing we need to enable is the OEM unlocking option on Samsung Galaxy S20 Plus.
- Again head over to Settings → Developer options → toggle ON the OEM unlocking option.
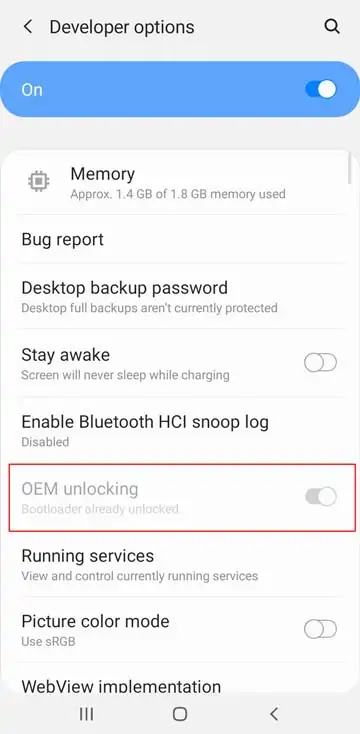
- Next select “Enable” when prompted to confirm.
- Again head over to Settings → Developer options → toggle ON the OEM unlocking option.
- Now we are ready to Unlock the Bootloader on your Samsung Galaxy S20 Plus.
- First, power off your Samsung Galaxy S20 Plus smartphone.
- Connect your phone to the PC while holding the Volume Up and Volume Down keys together until you see the bootloader screen.
- Now press Volume Up key to enter “Device unlock mode.”
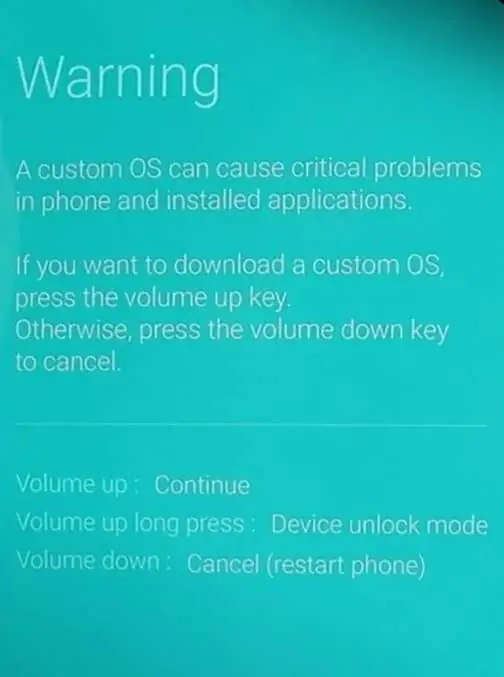
- Again press Volume Up key to confirm Bootloader Unlocking on Samsung Galaxy S20 Plus.
- Your device Bootloader is unlocked, and it should reboot automatically.
Once your device boots up, complete the on-screen settings. Download Magisk ZIP Latest Version on your phone and save it to your phone’s internal storage.
Step 2: Boot your Samsung Galaxy S20 Plus into Download Mode
- First, power off your Samsung Galaxy S20 Plus device.
- Connect your smartphone to your PC while holding the Volume Down and Power keys together.
- You will now see the Bootloader screen.
- Now press Volume Up key to enter Download Mode.
Step 3: Flash TWRP on Samsung Galaxy S20 Plus using Odin flash tool
- First, extract the Odin zip file to your desktop.
- Open the extracted folder and run Odin3 xxx.exe file.
- Connect your Galaxy device to a PC/Laptop.
- You will see
ID:COMsection light up blue. It means the PC successfully recognizes your phone.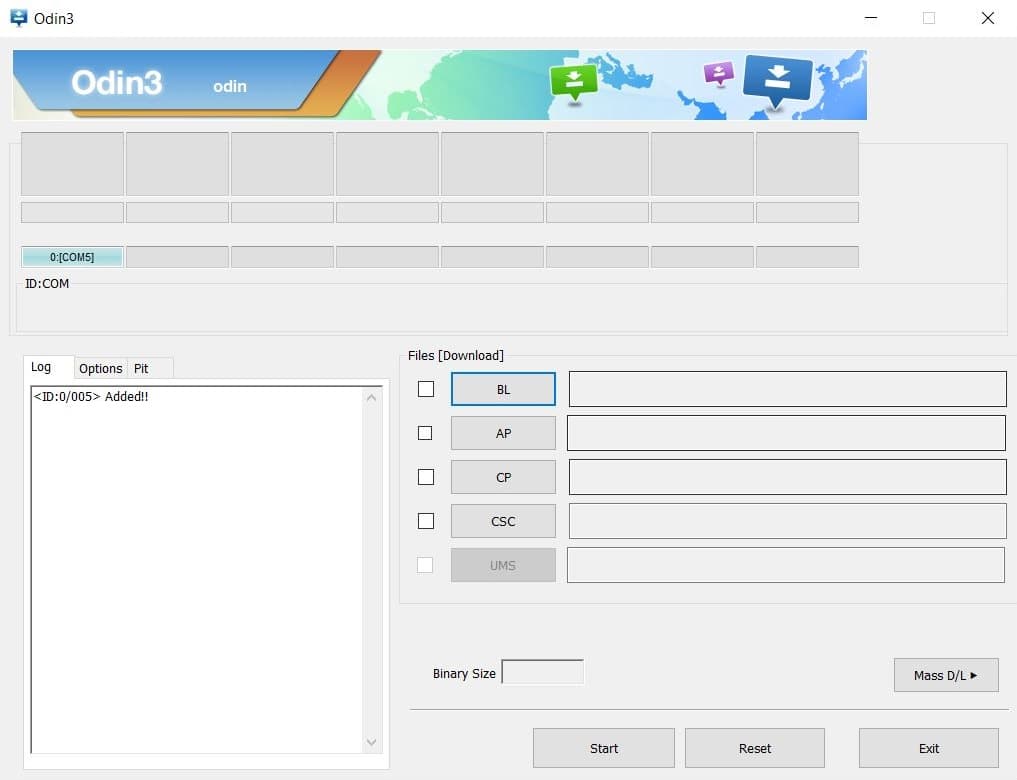
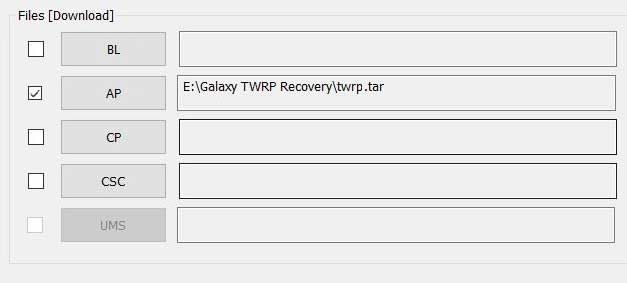
- Click on the AP tab option and select the TWRP recovery file. (Again, make sure that the recovery is a .tar file, or it may cause some problems.)
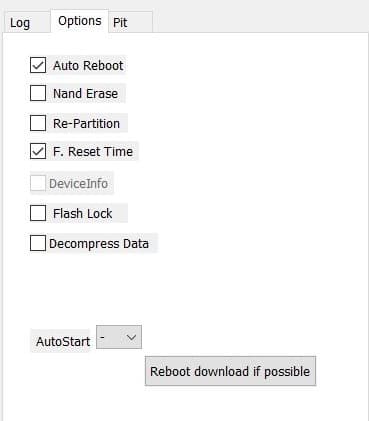
- Head over to the “Options” tab and untick the Auto Reboot option.
- Once done, finally, click “Start” to begin the flashing process.
- If the flashing is successful, you should see the PASS message on the Odin screen.

- Once the process completes, press the Volume Down + Power keys to exit Download mode.
- That’s it you have successfully flashed TWRP recovery on your Samsung Galaxy S20 Plus smartphone.
You can now Boot your Samsung Galaxy S20 Plus into TWRP Recovery by press & hold the Volume Up + Power button until you see the Samsung logo on the screen, release all the buttons, and your device will boot into TWRP Recovery Mode.
Step 4: Root Samsung Galaxy S20 Plus using Magisk
Now we are finally ready to flash the Magisk zip file on Samsung Galaxy S20 Plus.
- On the TWRP recovery page, Select Wipe → Advanced Wipe → Select Cache and User Data.
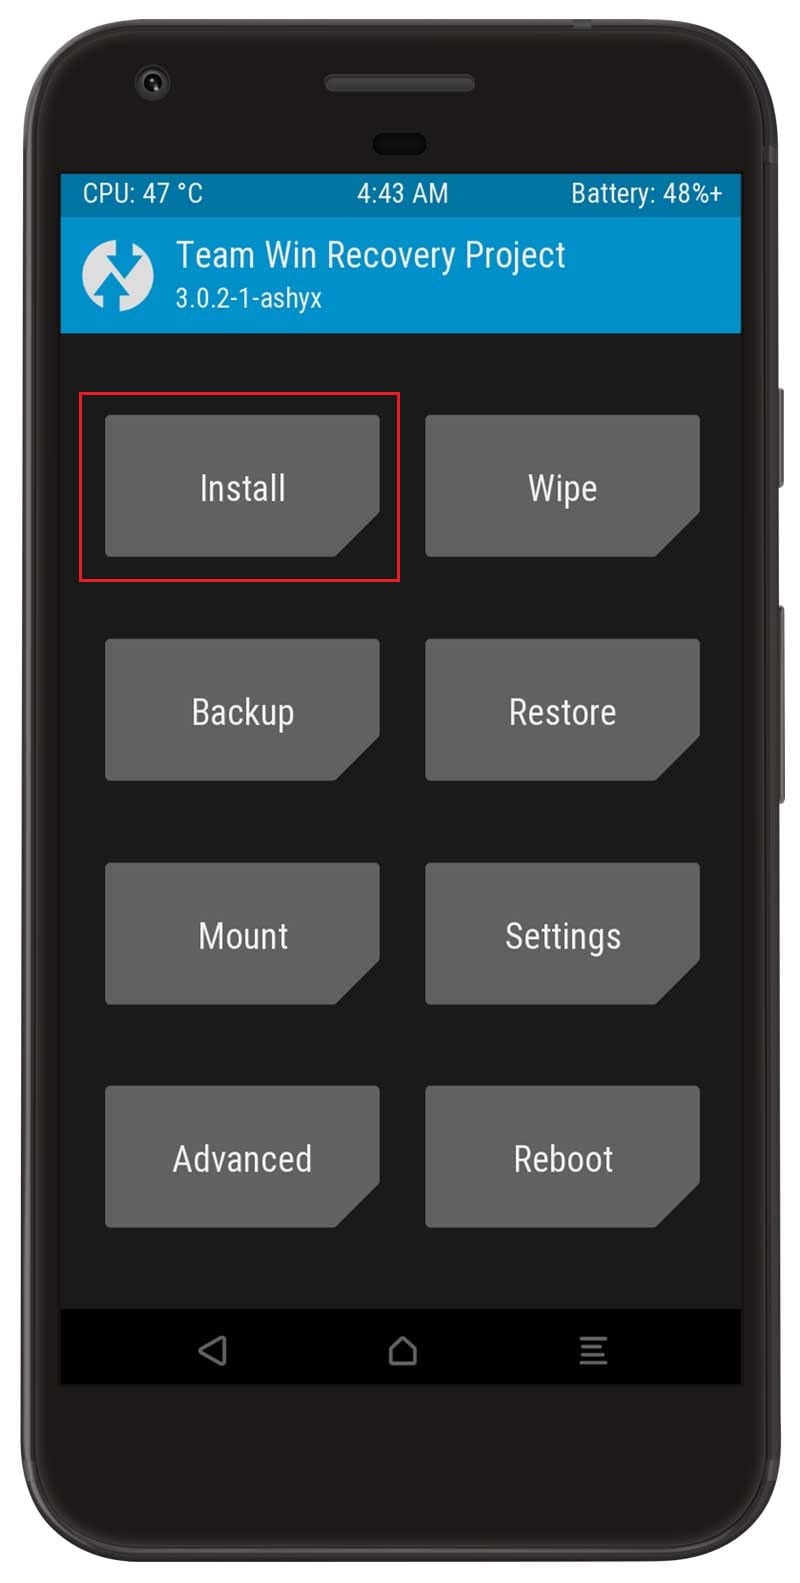
- Go back to TWRP home select Install.
- Locate the Multi Disabler.zip file and select it.
- Next, Swipe to confirm Flash.
- Again go back to TWRP home select Install.
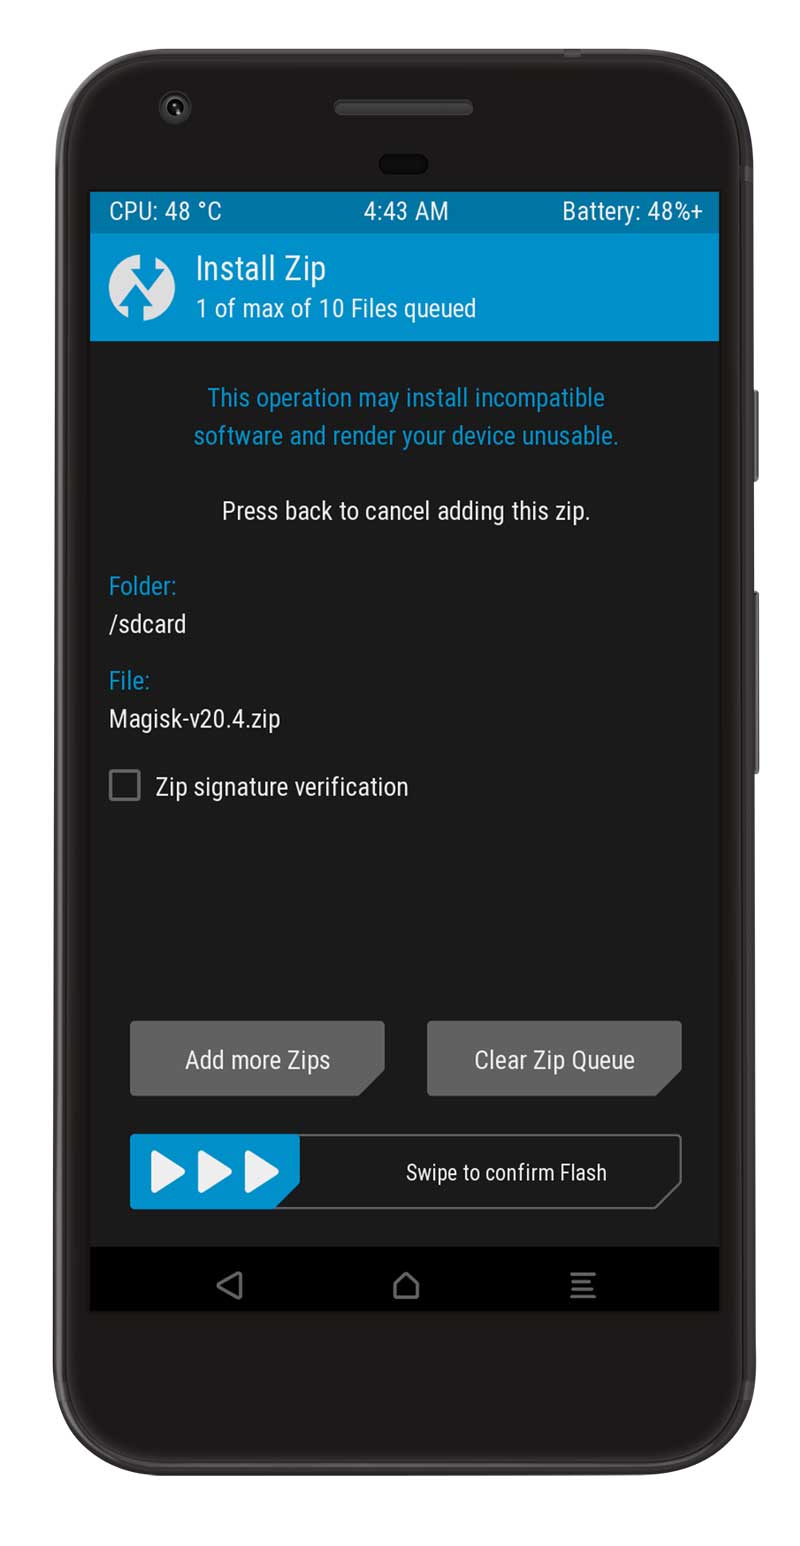
- Locate the Magisk zip file and select it.
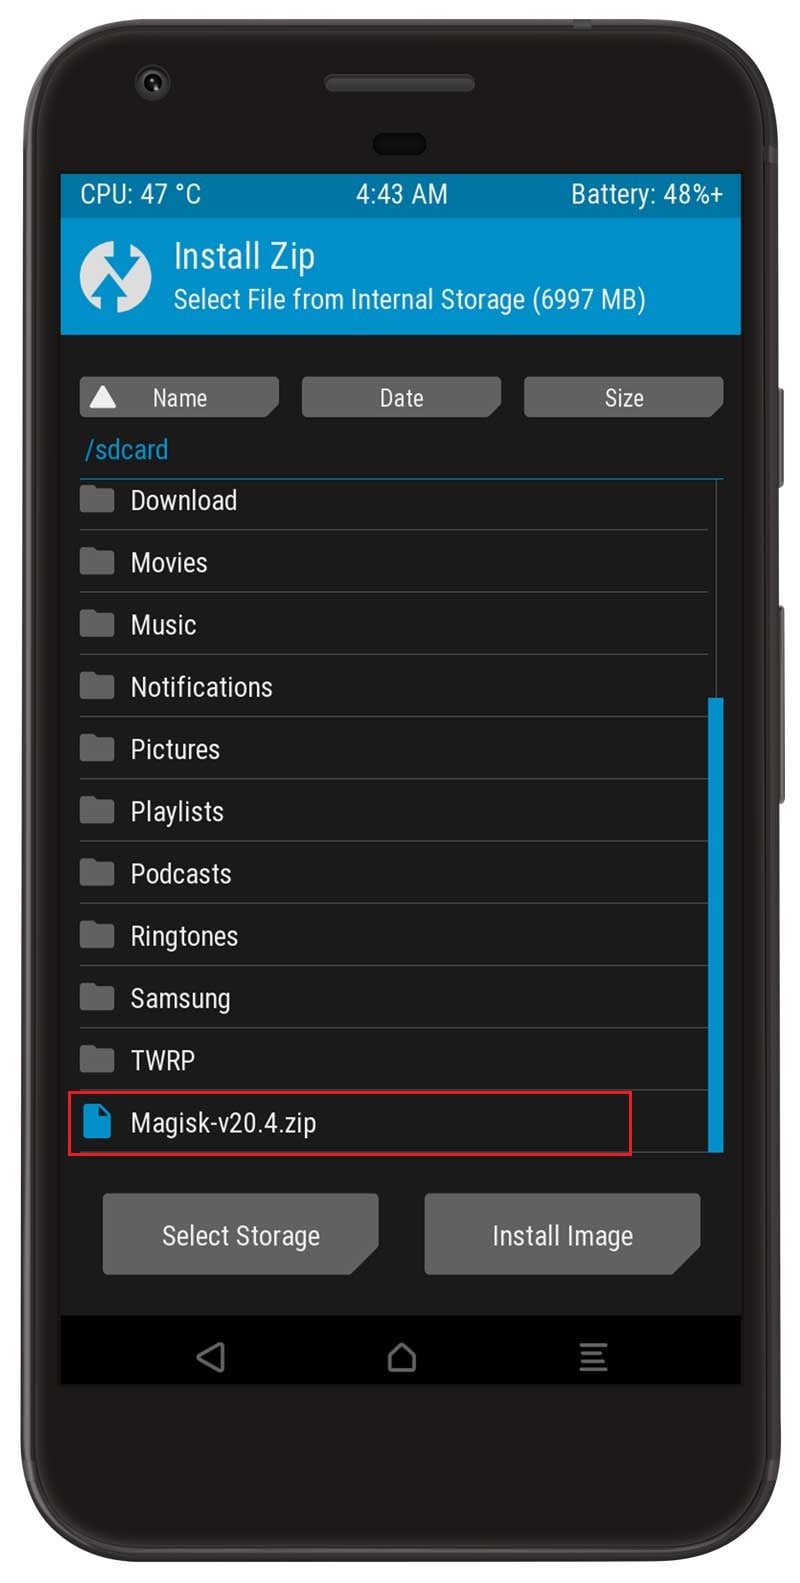
- Next, Swipe to confirm Flash.
- Once the flashing process completes, tap on the Reboot system.
- That’s it. You have successfully rooted your Samsung Galaxy S20 Plus device.
You can also verify if your rooted Samsung Galaxy S20 Plus passes SafetyNet by pressing the “Check SafetyNet” button in Magisk App.

After your device boots up, you will see Magisk App installed on your phone. This app will help you manage Root permissions, install Magisk Modules, the Magisk hide feature, and much more.
If you can’t see the app, simply download it from here – Magisk App.
[su_box title=”Related Articles” box_color=”#01B09B” radius=”0″]
- How to Root Samsung Galaxy M40
- Root Samsung Galaxy A90 5G using Magisk
- How to Root Samsung Galaxy F41
- Root Samsung Galaxy A01 with Magisk
- Root Samsung Galaxy S21, S21+,S21 Ultra using Magisk
[/su_box]
Wrapping Up –
If you’ve been considering rooting your Samsung Galaxy S20 Plus but didn’t know where to start, this guide should help. We hope that we have answered any questions about the process of rooting a device and provided enough information for anyone who may be interested in doing it themselves.
Whether or not you choose to root your phone is up to you; our goal was simply to provide helpful guidance on how one can go about the task if they are so inclined.
To conclude, here are some final thoughts from us at MagiskApp before signing off! Are you able to successfully root your device? Let us know below with comments!