Samsung Galaxy A51 Specification
After launching the Samsung A50 smartphone, Samsung had launched the Samsung Galaxy A51 smartphone with few extended features and different price. Galaxy A51 is the most beautiful creation by Samsung and is more professionalized by the punch -hole camera on the front screen. The Samsung A51 provides a streamlined Android 10 version and comes with the brilliant 48MP quad-camera support.
It was first announced in December 2019, but now, it’s launched in almost every country worldwide. Samsung A51 is an elegant smartphone which is designed in the most refined manner. On the front screen of the phone, you’ll observe a 6.5 inches large Super AMOLED display having full HD 1080p resolution. Basically, it’s amazed by the frontside corning gorilla glass 3 placement and back body made of plastic. Apart from that, Samsung A51 is the most lightweight creation of the Samsung A series having just 172 grams of weight.
Samsung A51 is a performative phone which flashes tremendous different and massive configurations which basically provide you with the mighty performance. It’s implanted with the Exynos 9611 octa-core processor which will nourish your powerpack with the most potent performance. Apart from that, the Samsung A51 consists of the most adorable quad-camera setup having 48+12+5+5 MP flawless lenses as well as a most luminous LED Flashlight.
The networking technology of Samsung A51 is literally excellent since this intelligent smartphone provides the GSM+HSPA+LTE network configuration as well as full Wi-Fi Calling and Bluetooth Tethering support. The Samsung A51 is installed with the brand-quality audio speakers in the below most side, which will make you experience the smoothest surrounding sound. A51 is a powerful product developed by Samsung technologies and furnished with 4000 mAh powerful battery as well as 15W fast charger. Basically, Samsung has manufactured this device in three different colours Prism Crush Black, Prism Crush White and Prism Crush Blue starting with 23,999.00 INR.
Steps to Root Samsung Galaxy A51
Below I have shown step by step procedure to Root Samsung Galaxy A51. You have to follow every step carefully, or else you may face trouble booting up your device again.

Please read the complete guide before applying the steps. This will avoid confusion.
Things to remember
- Make sure to disable all security Locks on your Samsung Galaxy A51.
- Take Full Backup of your Android device.
- You need a PC to perform the Commands.
- Fully charge your phone.
- Samsung Galaxy A51 Original USB Cable.
Note: Rooting is a complex process, so if you miss any of the below steps will end up bricking your device. So, make sure to follow all the steps carefully as shown.
We are not responsible for any loss and damage to your device. Apply the below steps with your own risk.
Step 1: Unlock Bootloader on Samsung Galaxy A51
- First, we need to enable Developer Options on Samsung Galaxy A51.
- Go to “Settings” on your Samsung Galaxy A51.
- Scroll down to the very bottom of the screen and select “About phone.”
- Next, select “Software information.”
- Tap on the “Build number” 5-6 times.
- Enter your phone’s lock screen PIN/Password/Pattern if prompted.
- You will now see the
"Developer mode has been enabled!"toast message on the screen.
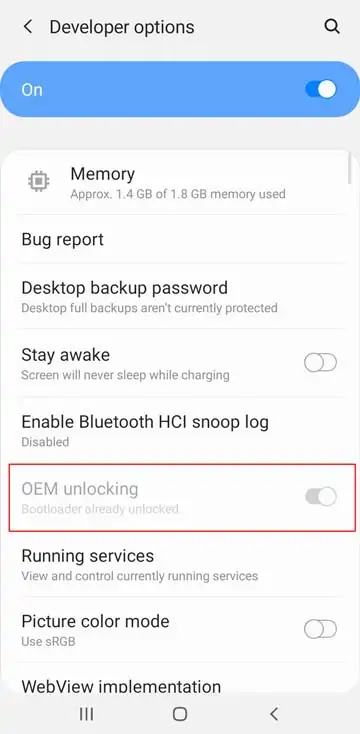
- The next thing we need to enable is the OEM unlocking option on Samsung Galaxy A51.
- Now we are ready to Unlock Bootloader on your Samsung Galaxy A51.
- First, power off your Samsung Galaxy A51 smartphone.
- Connect your phone to the PC while holding the Volume Down + Power keys together until you see the bootloader screen.
- Now press Volume Up key to enter “Device unlock mode.”
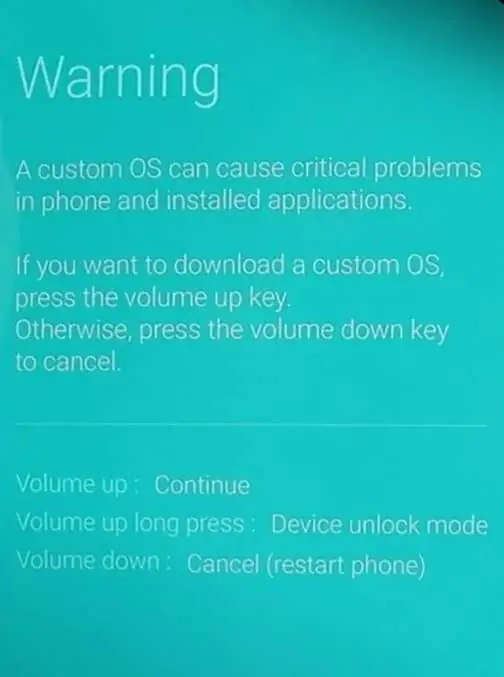
- Again press Volume Up key to confirm Bootloader Unlocking on Samsung Galaxy A51.
- Your device Bootloader is unlocked, and it should reboot automatically.
Downloads
In any steps, if the particular file is asked you to download, then you can come here and download it. We will update the links according to the latest build by developers.
- Download Magisk App (Latest Version) [Phone]
- Samsung USB Drivers (Optional) – Download [PC]
- Odin Flash Tool (Latest) – Download [PC]
- 7Zip-ZS (Latest) – Download [Install it]
- LZ4 – Download [PC] [Extract the Zip file]
Step 2: Download Stock Firmware for Samsung Galaxy A51
You can download Samsung stock firmware from various sources, but the huge problem is the Speed. By using the Frija tool, you can download stock firmware files at high speed.
- Download Latest Frija Tool.

- Extract the zip file to your windows desktop.
- Open the extracted folder and double-click on the
frija.exefile to launch the tool. - We need two things, first your phone’s model number and second, and CSC/regional code.
- You can get your phone model number by going to Settings → About phone.
- To view the CSC code, you can download “Phone Info SAM“ app.
- Once you have the above information, enter the required data in the Frija tool.
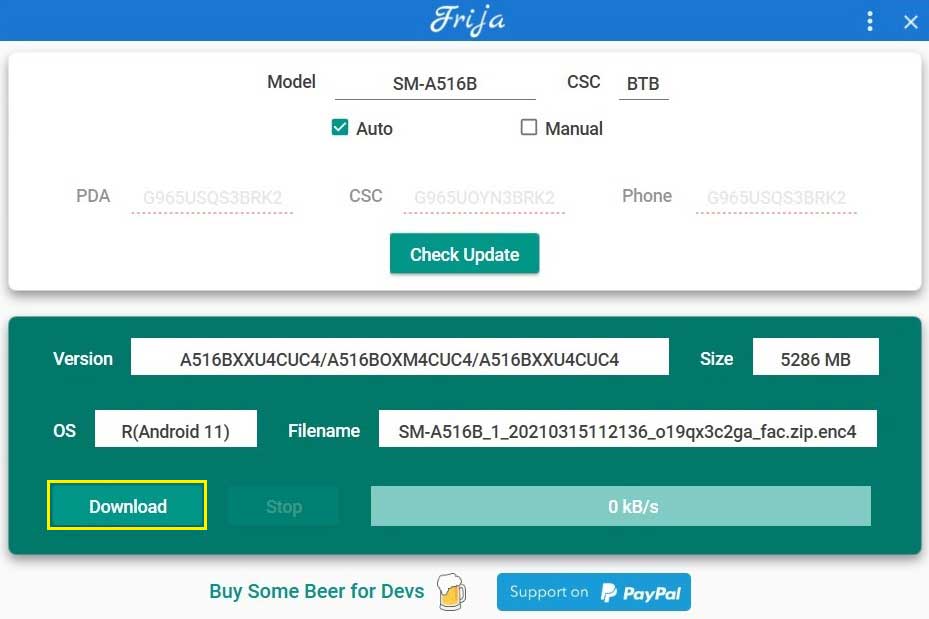
- Finally, click on the Download button.
Step 3: Preparing Patched Boot Image file
- Extract the downloaded firmware package on your PC.
- Open the extracted folder, you will see five firmware files in
.tar.md5format.
- Right-click on the AP firmware file, hover into the 7-Zip option and select Extract files.
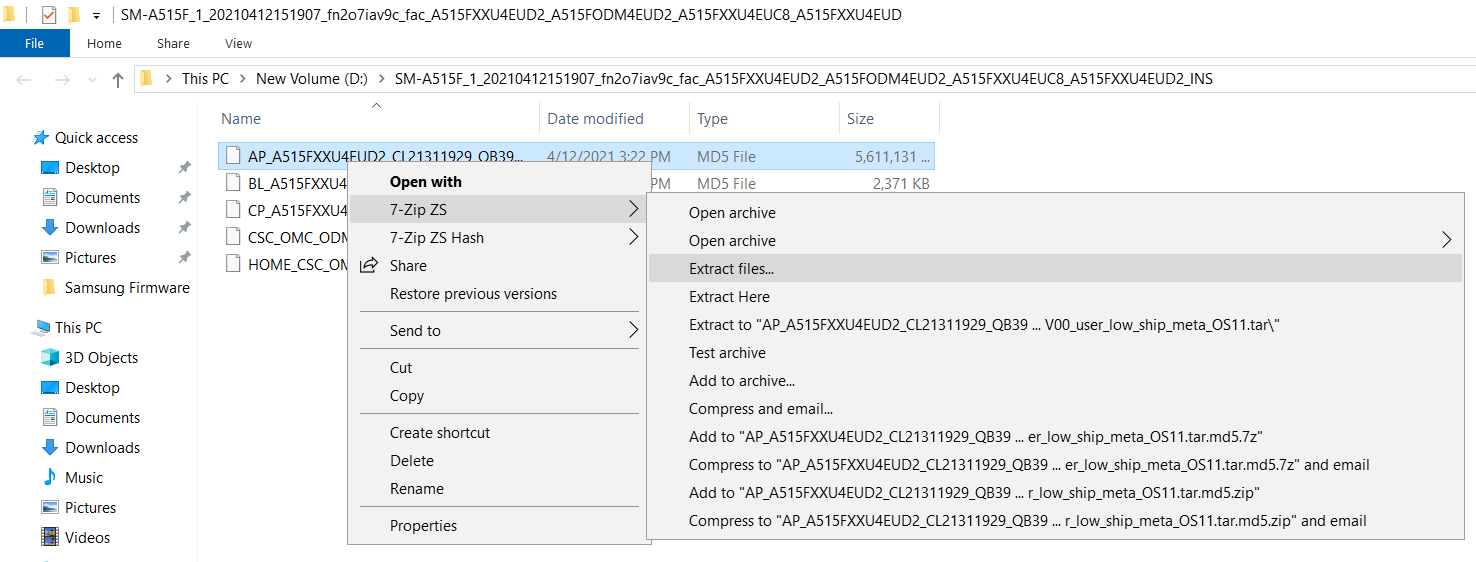
- Now you will find several files along with the
boot.img.lz4andvbmeta.img.lz4.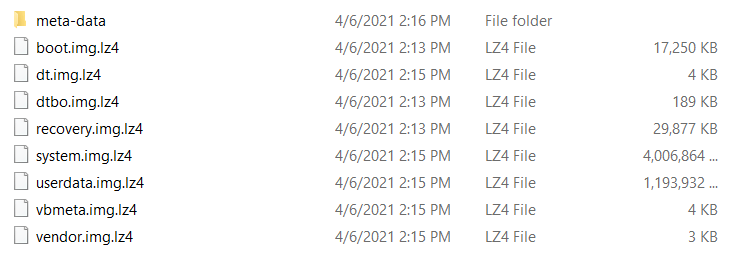
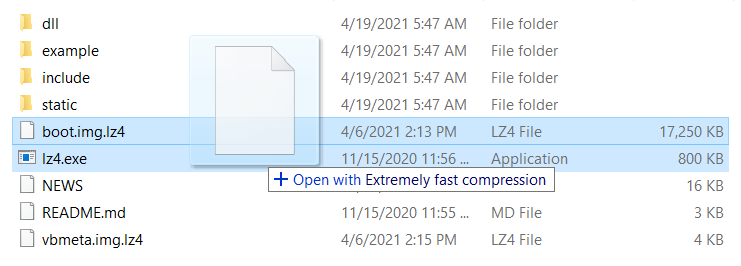
- Copy
boot.img.lz4andvbmeta.img.lz4to LZ4 Installed folder.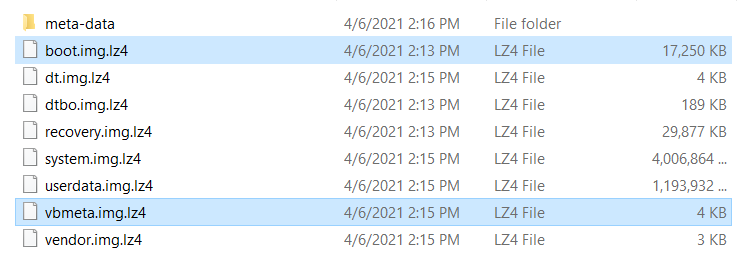
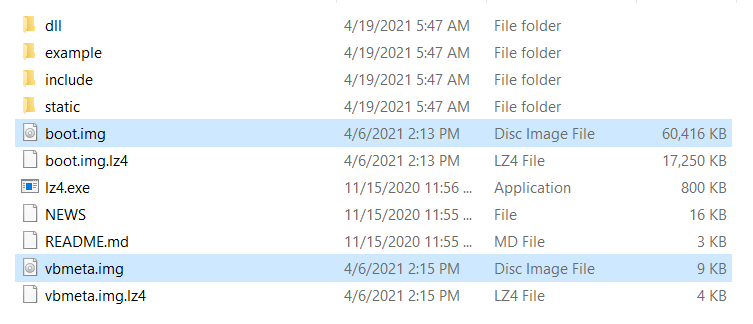
- Next we have to convert .img.lz4 to .img file. To do that, follow the below steps:
- Connect Samsung Galaxy A51 device to your PC/Laptop.
- Now copy the “AP” file from the Firmware folder to your phone’s internal storage.
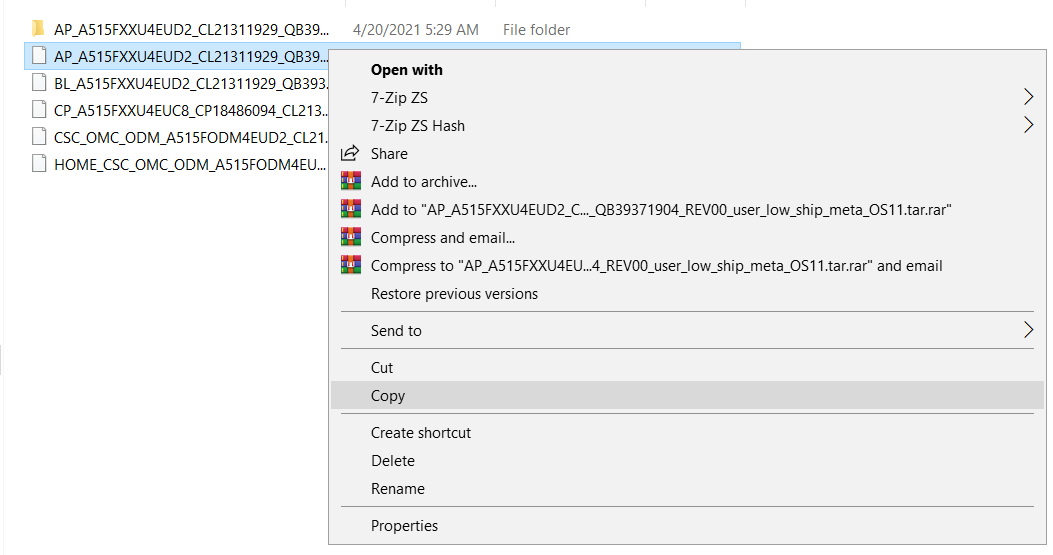
- Now the next step you have to follow on your phone.
Step 4: Patch the AP Firmware File with Magisk App
- Download and install Magisk App on your phone.
- Open the Magisk app from the app drawer.
- Tap on the “INSTALL” button.
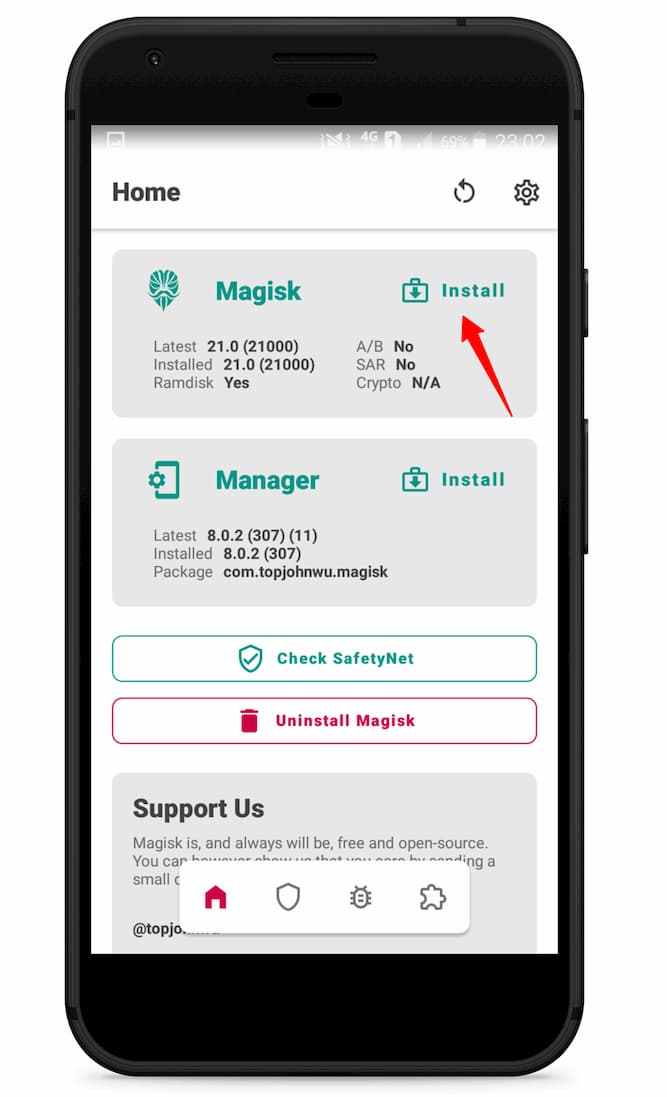
- Now here tap on the “Select and Patch a File.”
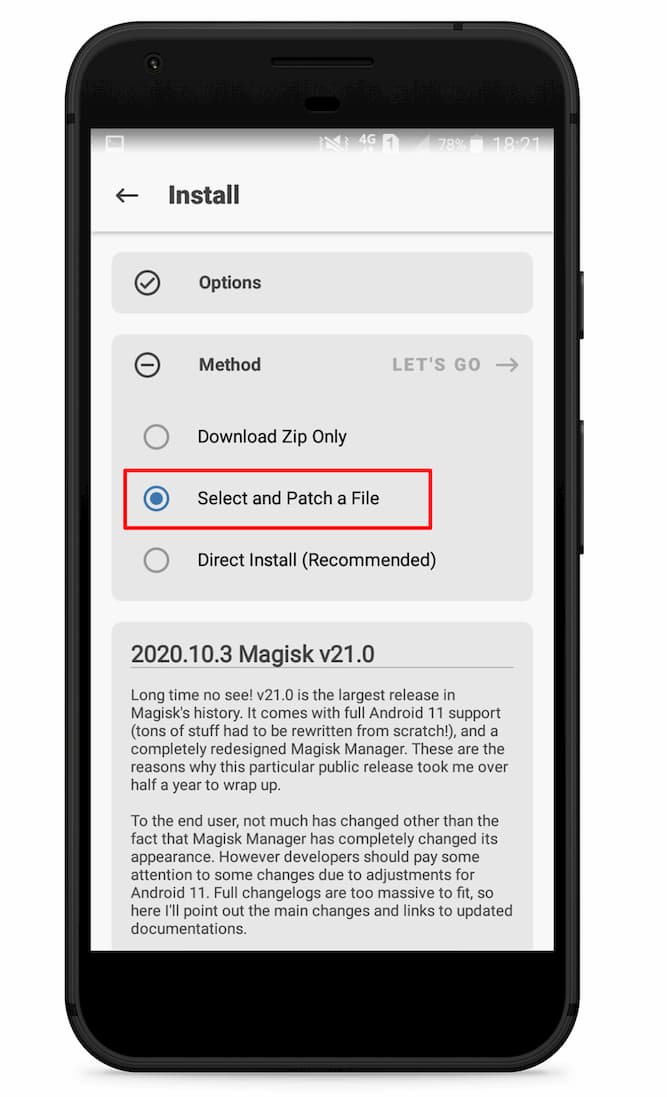
- Navigate to the internal storage and select the AP firmware file that you previously copied to the phone.
- Once the file is selected, tap on “LET’S GO.”
- Wait until Magisk patches the file.
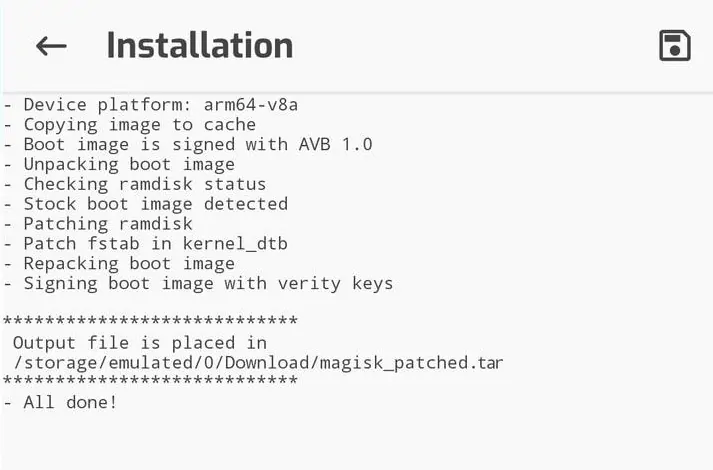
- The patched image file can be found in the “Downloads folder.”
- Now connect your phone to the PC and copy the
magisk_patched.tarfile to the “firmware folder” on your PC.
- Extract
magisk_patched.tarfile. - Now head over to the “LZ4 folder” and copy
vbmeta.imgfile to Magisk Patched folder.
- Select
boot.imgandvbmeta.imgfile, right-click on the files, and “Add to archive.”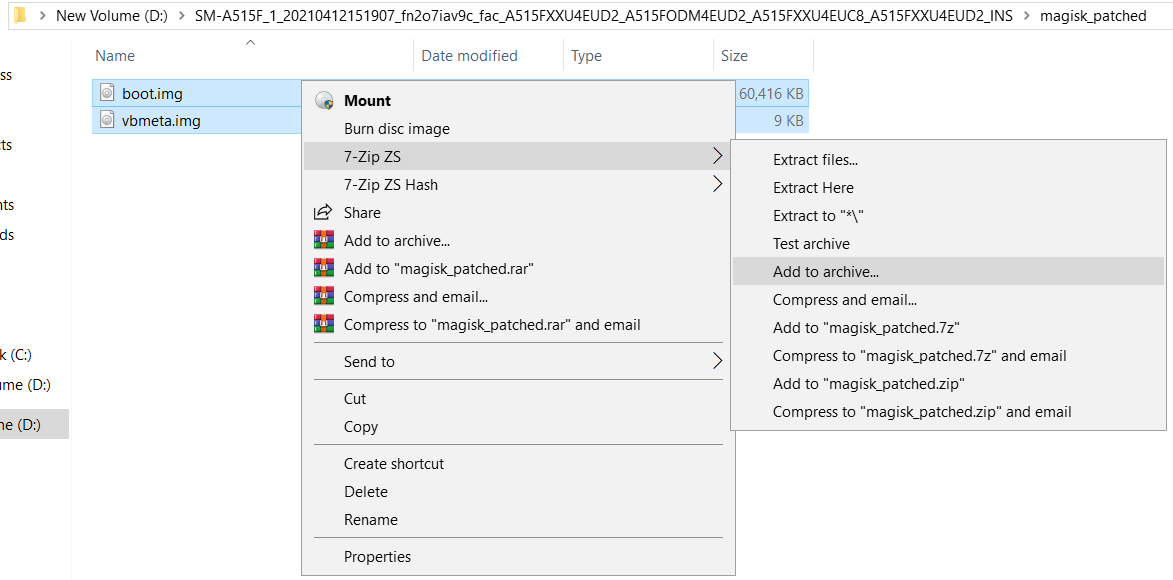
- Select the Archive format to tar and tap on ok.
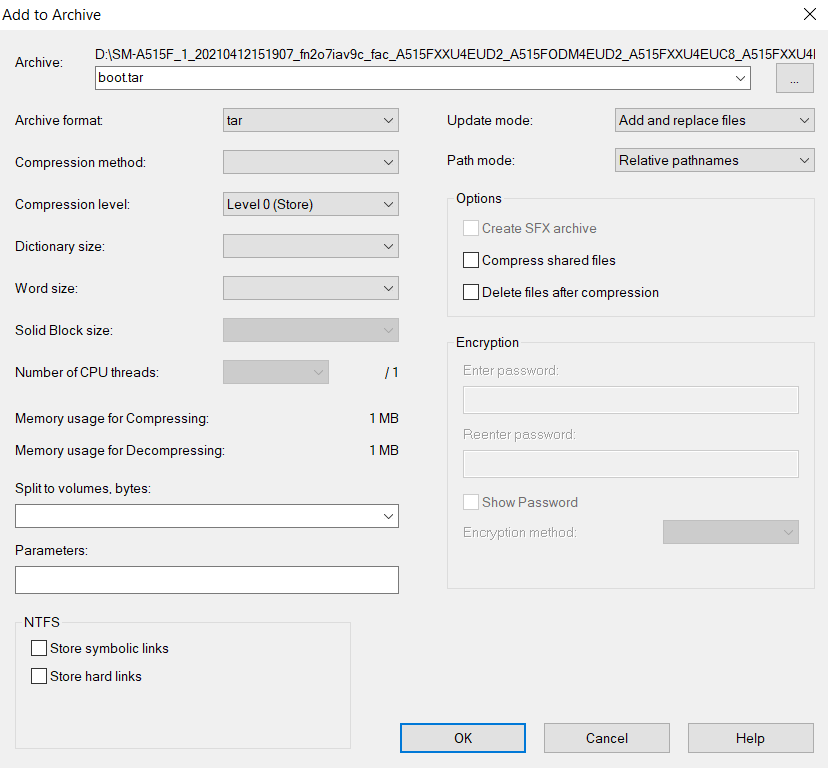
- Now you will see the boot.tar Odin flashable file.

Proceed to the next step.
Step 5: Boot your Samsung Galaxy A51 into Download Mode
- First, power off your Samsung Galaxy A51 device.
- Connect your smartphone to your PC while holding the Volume Down + Power keys together.
- You will now see the Bootloader screen.

- Now press Volume Up key to enter Download Mode.
Step 6: Flash Patched Boot.tar using Odin flash tool
- First, extract the Odin zip file to your desktop.
- Open the extracted folder and run Odin3 xxx.exe file.
- Connect your Galaxy device to PC/Laptop.
- You will see
ID:COMsection light up blue. It means the PC successfully recognizes your phone.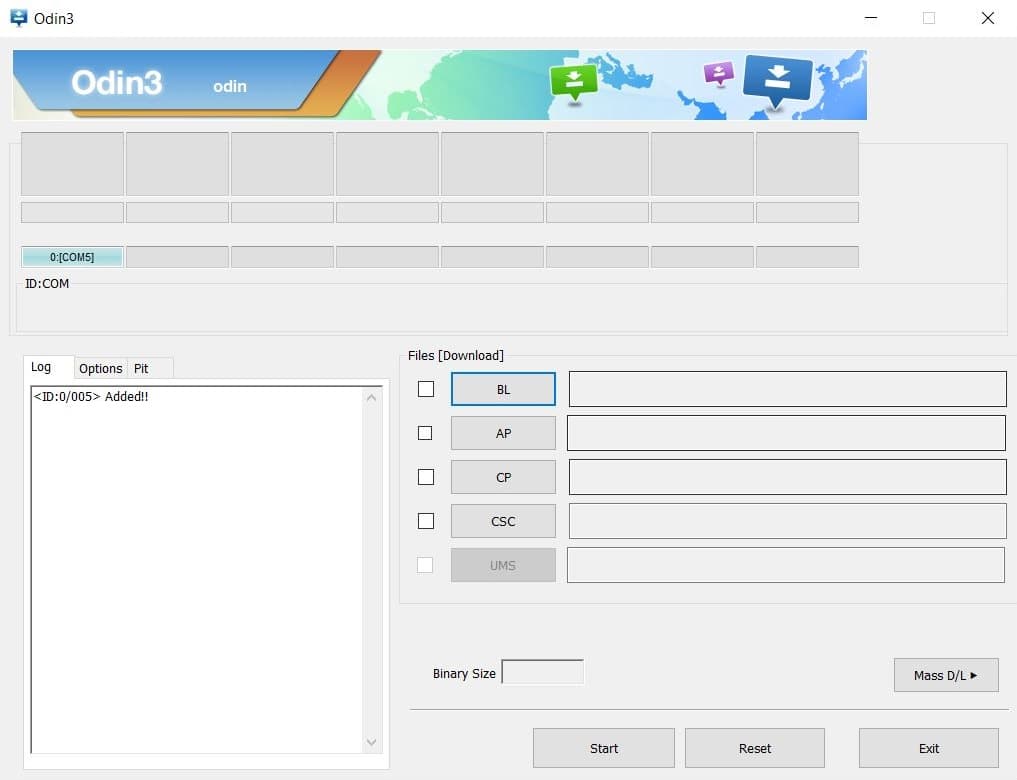
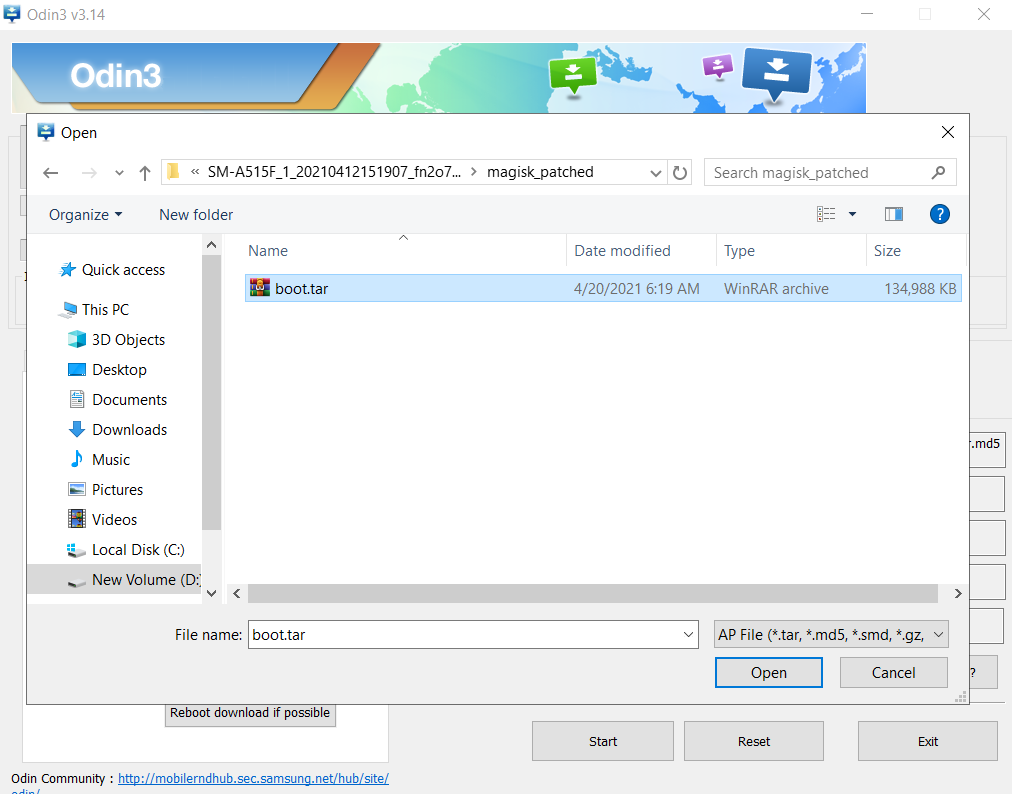
- Click on the following slot buttons and select the corresponding firmware files:
- Tip: For BL, CP, CSC you have to select files from the “firmware folder”. For AP you have to select the patched boot.tar file (Check Step 6, 14th step.)
- BL: Select the firmware file starting “BL”
- AP: Select the Patched AP firmware file (boot.tar)
- CP: Select the firmware file starting “CP”
- CSC: Select the firmware file starting “HOME_CSC”
- Once all firmware files are loaded to the Odin tool.
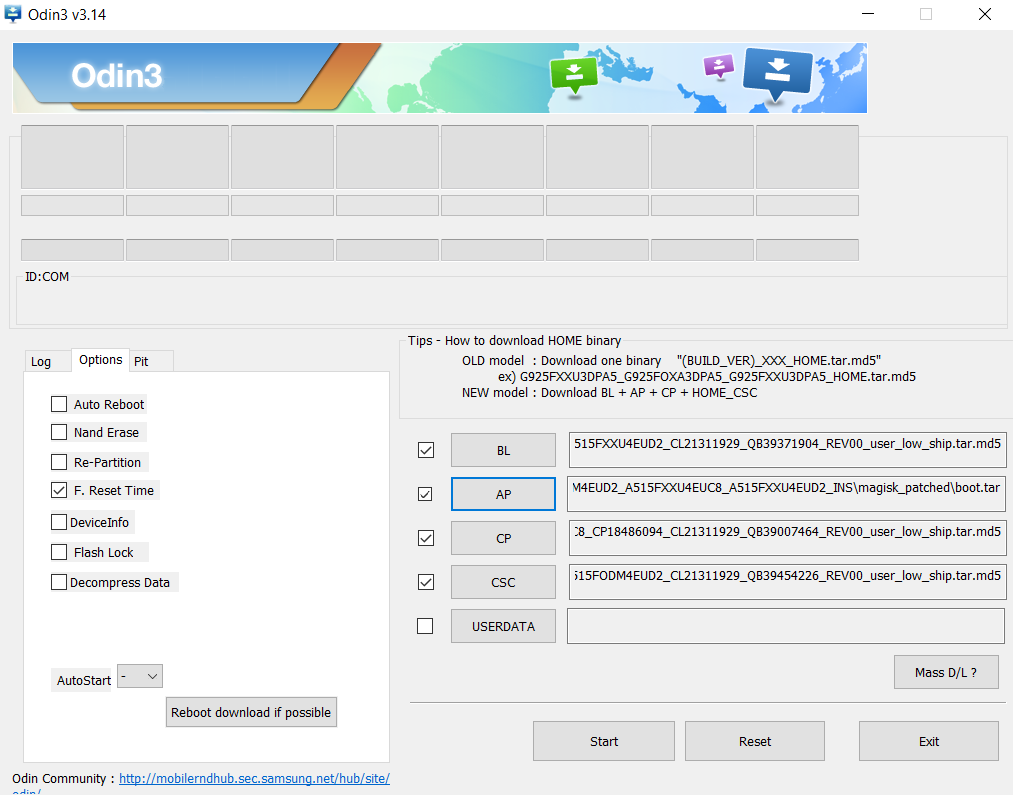
- Make sure to untick the Auto Reboot option under the “Options” tab.
- Once done finally, click “Start” to begin the flashing process.
- If the flashing is successful, you should see the PASS message on the Odin screen.

- Once the process completes, press the Volume Down + Power keys to exit Download mode.
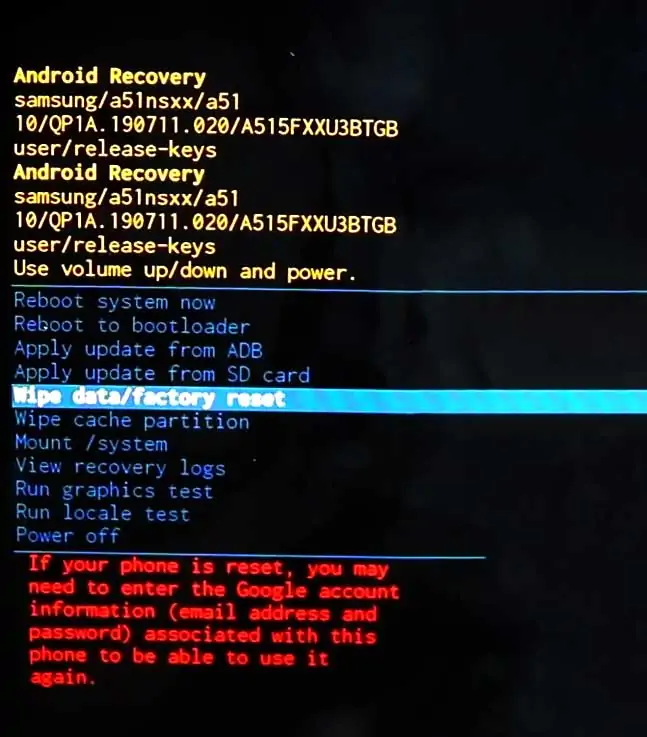
- As soon as the screen goes black press the Volume Up + Volume Down + Power keys to boot into Recovery mode.
- Now once the Galaxy A51 boots into stock recovery mode follow the below steps.
- The first boot will take some time.
- That’s it! You have successfully rooted Samsung Galaxy A51 using Magisk.
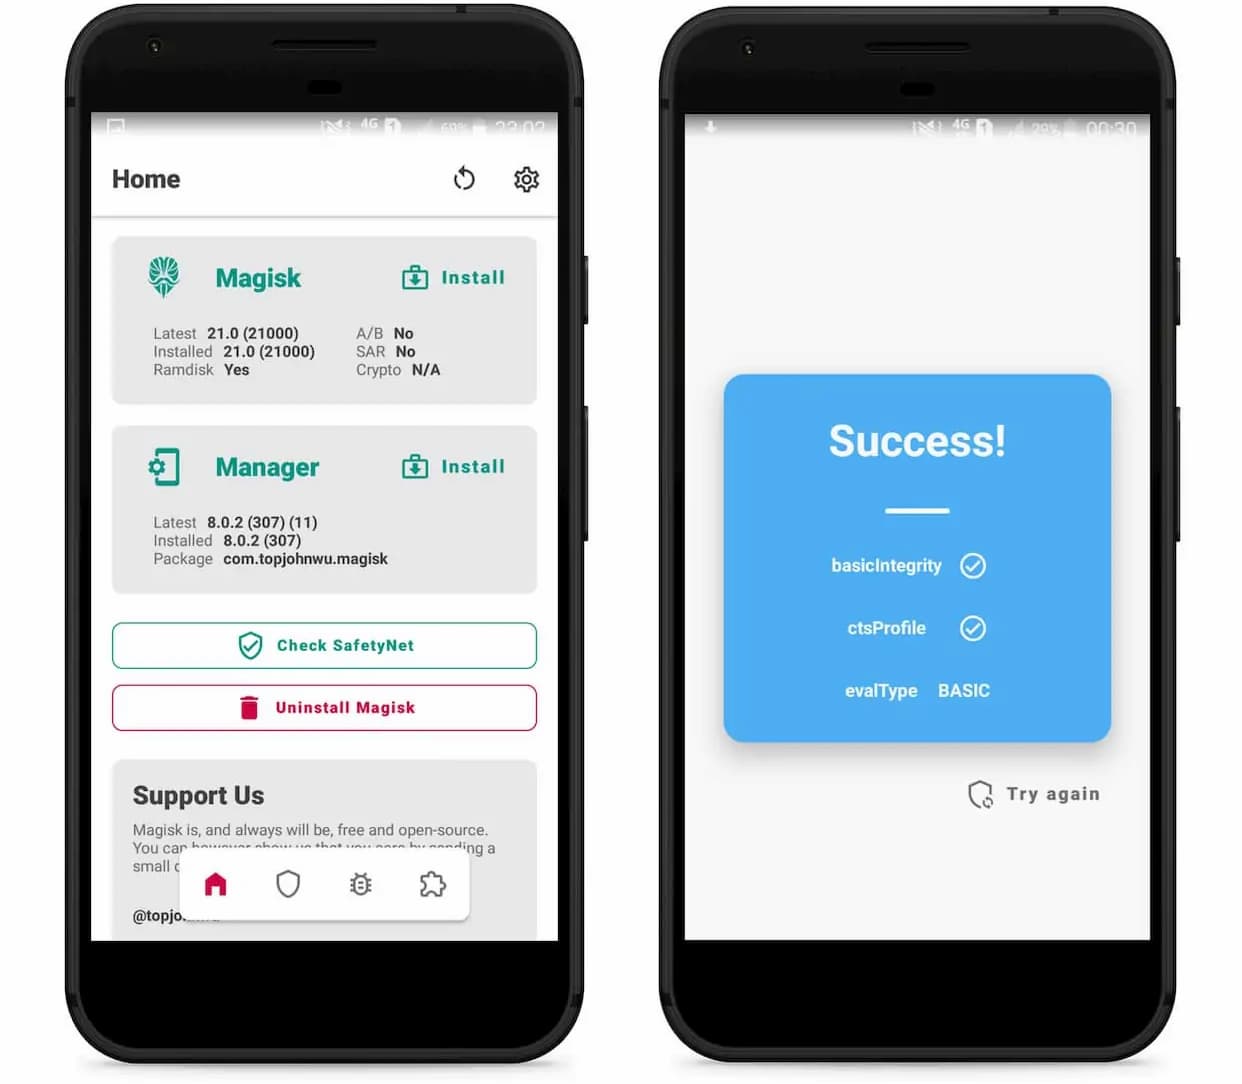
You can also verify if your rooted Samsung Galaxy A51 passes SafetyNet by pressing the “Check SafetyNet” button in Magisk App.
Now that your device has successfully gained root access, you can try out amazing Magisk Modules and Xposed Framework on your Galaxy device.
Here are the few recommended Magisk Modules you must try:
[su_box title=”Related Articles” box_color=”#01B09B” radius=”0″]
- How to Root Samsung Galaxy M40
- Root Samsung Galaxy A90 5G
- How to Root Samsung Galaxy M30s
- Root Samsung Galaxy A42 using Magisk
- How to Root Samsung Galaxy S20 Plus using TWRP
[/su_box]
Wrapping Up –
