Do you own a OnePlus Nord CE 5G android smartphone? If yes, today, we will share with you how you can Root OnePlus Nord CE 5G with the help of the Magisk Root method.
You can root this newly launched OnePlus device with five easy steps. However, you need to be very careful while performing the steps. Therefore, I highly suggest you read the complete guide first. Once you understand the steps, you can proceed to root your phone.
We will be using the Magisk Root method, and the reason is straightforward, Magisk is the safest way to root android without altering the system files. This basically means Magisk will not edit or modify android core files, and you can manage root access with the help of the Magisk App.
The best thing about Magisk App is that it gives you various features that will help you customize your OnePlus Nord CE smartphone. For example, you can Hide Magisk on your device, install Magisk Modules directly from the app, get a direct option to Reboot into recovery, Reboot into bootloader mode, and much more.
I want to tell you that Backup your complete android before doing anything to your phone. Then, if anything goes wrong, the backup will help you to restore your files.
About OnePlus Nord CE 5G
Have you noticed that OnePlus recently have launched an incredible budget ranged Android smartphone? It’s one of those mid-range smartphones with brilliant features and the most current privileges.
As we know that OnePlus is the beast smartphone manufacturing brand, this time, they’re launching OnePlus Nord CE with an inbuilt Snapdragon 750G chip. This integrated processor chip will help you enjoy the upcoming 5G brilliant connection with advanced gaming on fingertips.
OnePlus Nord CE can be easily stared as a dazzling category smartphone since this device comes with Fluid AMOLED installed inside glass and hard plastic body. If You’ve got such a budget, you can’t find any Android smartphone with the same resources and price range.
This Nord series beast is offering you the 6.43-inch 90Hz display for a giant and performative experience. Moreover, You can watch all your favorite movies in FHD quality, with support of 1080 x 2400 pixels of resolution.
Now is the time to perform aggressively inside the gaming and designing world with your fingers! OnePlus Nord CE delivers the Qualcomm SM7225 Snapdragon 750G 5G chip, which fastens you and your experience smoother.
Additionally, This OnePlus mid-segment smartphone is operated with OxygenOS 11, based on the most current Android 11! So stop waiting and start enjoying the fastest process serving capability of OnePlus Nord CE, powered with Adreno 619 GPU.
Getting far away from the processor, the following stuff that everyone finds in today’s smartphones is the Camera. Today’s smartphone cameras are more futuristic than those powerful DSLRs, and consequently, OnePlus Nord CE delivers the Triple AI Camera setup, carrying 64MP wide, 8MP ultrawide, and 2MP depth lenses.
In simple words, You can capture the most impeccable clicks with this Nord variant at the ease of access. Battery Life can be the most lovable and the most annoying on any device, but no need to worry while using OnePlus Nord CE! This Nord Variant gave a comeback with a 4500mAH battery with the Warp Charge 30T technology.
This technology will assist you in charging your smartphone from 0 to 70% in just 30 minutes. So choose your desired color from Blue Void, Charcoal Ink, or Silver Ray, and order your OnePlus Nord CE right now, starting at 22,999.00 INR!
Steps to Root OnePlus Nord CE with Magisk
Below I have shown step by step procedure to Root OnePlus Nord CE. Of course, you have to follow each step carefully, or else you may face trouble booting up your device again.
Please read the complete guide before applying the steps. This will avoid confusion.
Things to remember
- Make sure to disable all security Locks on your OnePlus Nord CE.
- Take Full Backup of your Android device.
- You need a PC to perform the Commands.
- Fully charge your phone.
- OnePlus Nord CE Original USB Cable.
Note: Rooting is a complex process, so if you miss any of the below steps will end up bricking your device. So, make sure to follow all the steps carefully as shown.
We are not responsible for any loss and damage to your device. Apply the below steps with your own risk.
Step 1: Enable OEM Unlocking on OnePlus Nord CE
- Follow the below steps to enable USB debugging and the OEM Unlock option.
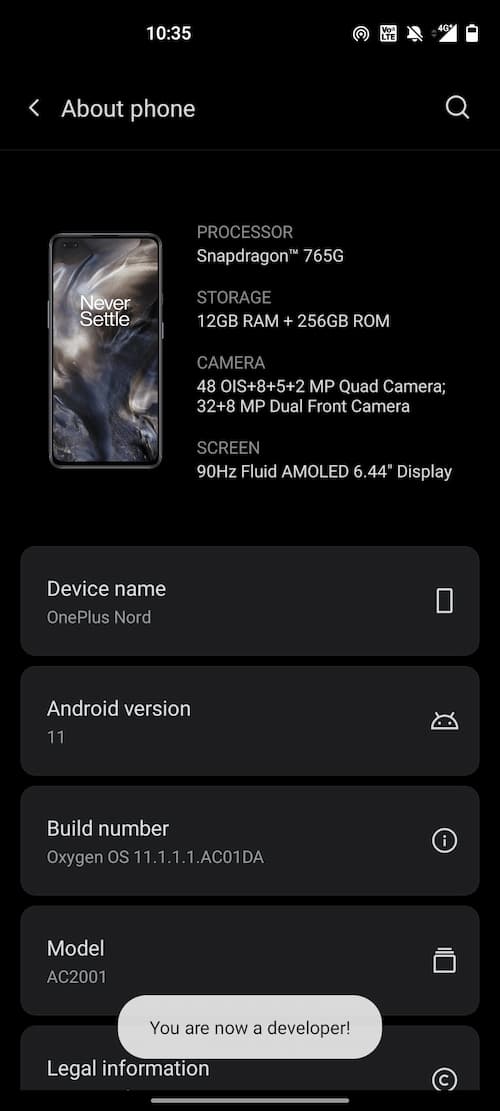
- Go to Settings → About Phone → Tap on Build number 5-6 times.
- Now go Back → System → Developer options → enable “OEM Unlocking” and “USB debugging.”
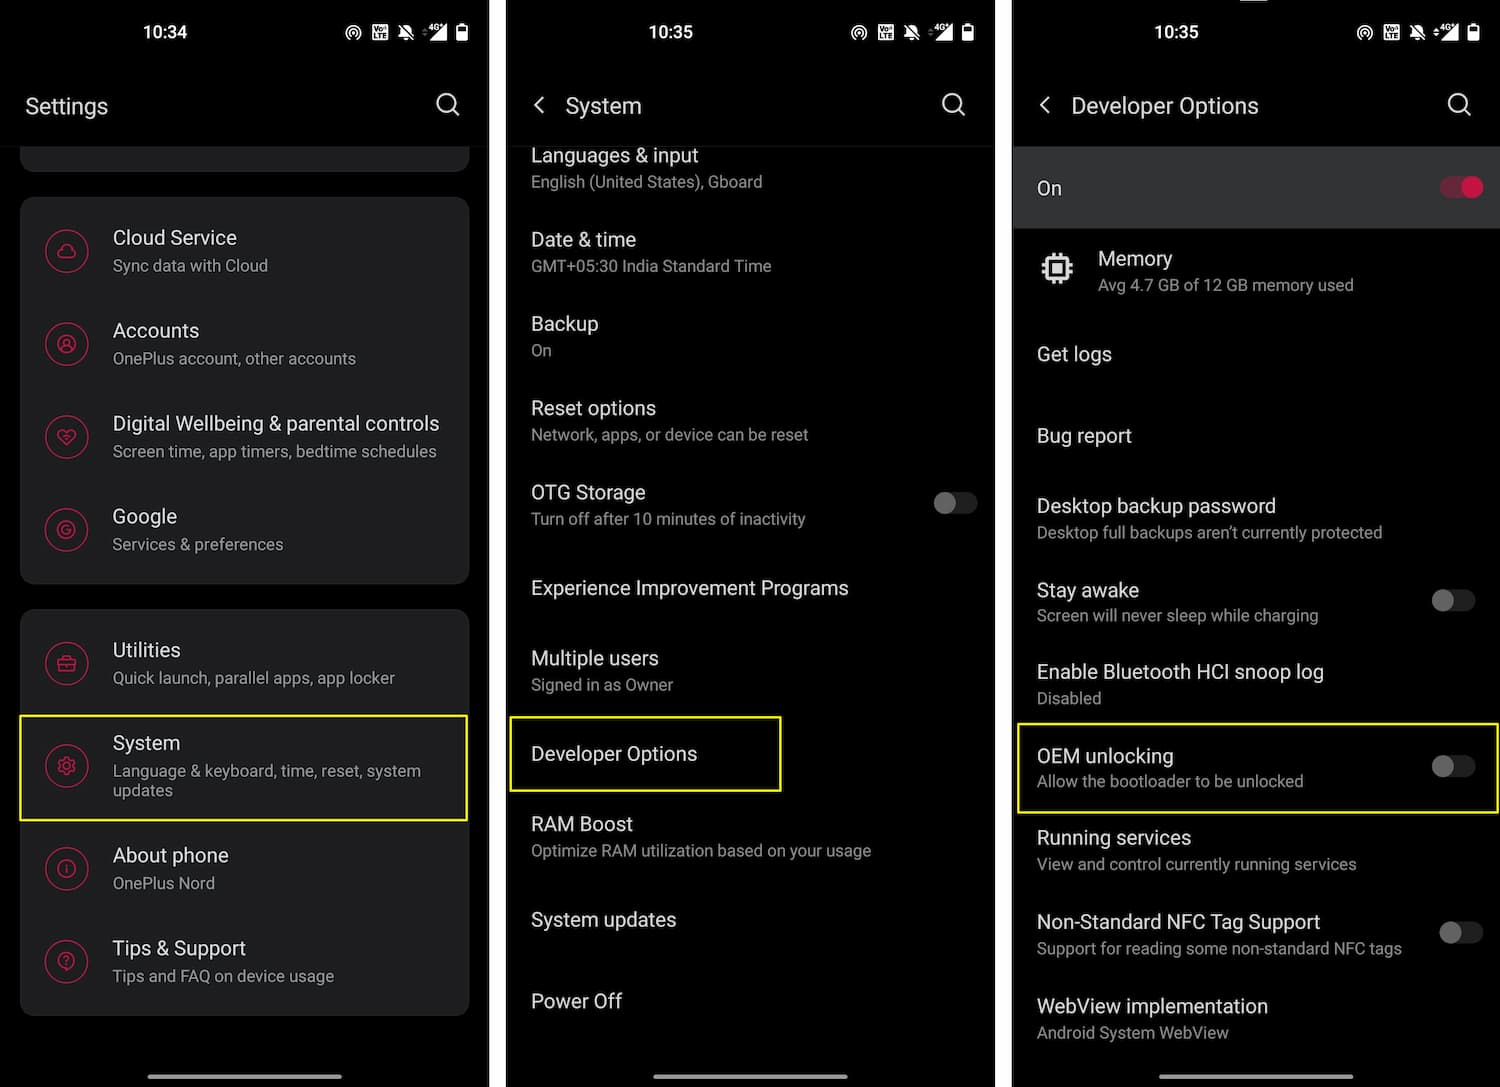
If you see the OEM unlocking option is missing or greyed out, you need to check few things.
- Make sure that you have logged into your Google account.
- Also, check if you have an active Internet connection or not.
Step 2: Unlock Bootloader on OnePlus Nord CE
- Connect your OnePlus Nord CE device to the PC using the original USB cable.
- Open the
Platform-toolsfolder and type “cmd” in the address bar and hit Enter.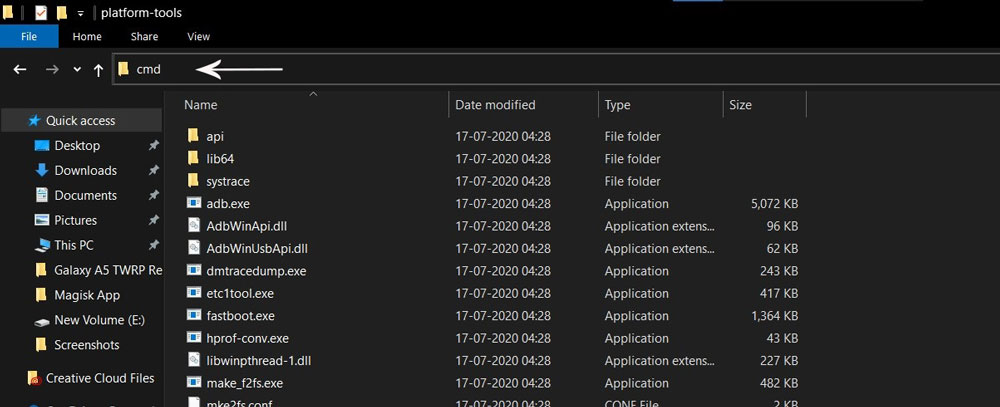
- The Command window will open.
- Connect OnePlus Nord CE to PC via original USB cable.
- On the command window, type the below command. It should display the connected devices.
fastboot devices
- Hit Enter, Next type the following command to boot OnePlus Nord CE into fastboot mode.
adb reboot bootloader
Press “Enter” on your keyboard
- Next, type the following command to Unlock the Bootloader on OnePlus Nord CE. (Note: Unlocking the bootloader will wipe all your data).
fastboot flashing unlock
Press “Enter” on your keyboard
- On your phone, press the Volume buttons to move the selector to “UNLOCK THE BOOTLOADER” and press the power button to confirm.
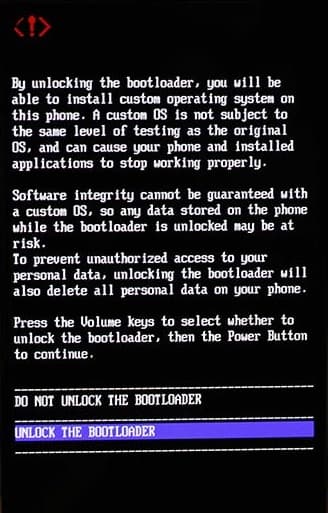
- After that, all your data will get erased, and your phone will freshly boot up.
- That’s It, the bootloader on OnePlus Nord CE is successfully unlocked!
Downloads
In any steps, if the particular file is asked you to download, then you can come here and download it. We will update the links according to the latest build by developers.
- Stock Boot Image for OnePlus Nord CE – Download (Download the Stock Boot Image according to your region.)
- Download Magisk App (Latest Version)
- OnePlus USB Drivers (Optional) – Download
- SDK Platform Tools – Download
Step 3: Install Magisk App on OnePlus Nord CE
- Download the Magisk App on your phone.
- Now extract the downloaded Stock Boot Image zip file.
- Copy
boot.imgfile from the extracted folder and transfer it to your phone’s internal storage. - Install Magisk App apk file on your device.
- Open the app and tap on INSTALL.
- Next, tap on the “Select and Patch a File” option and Locate the boot.img file.
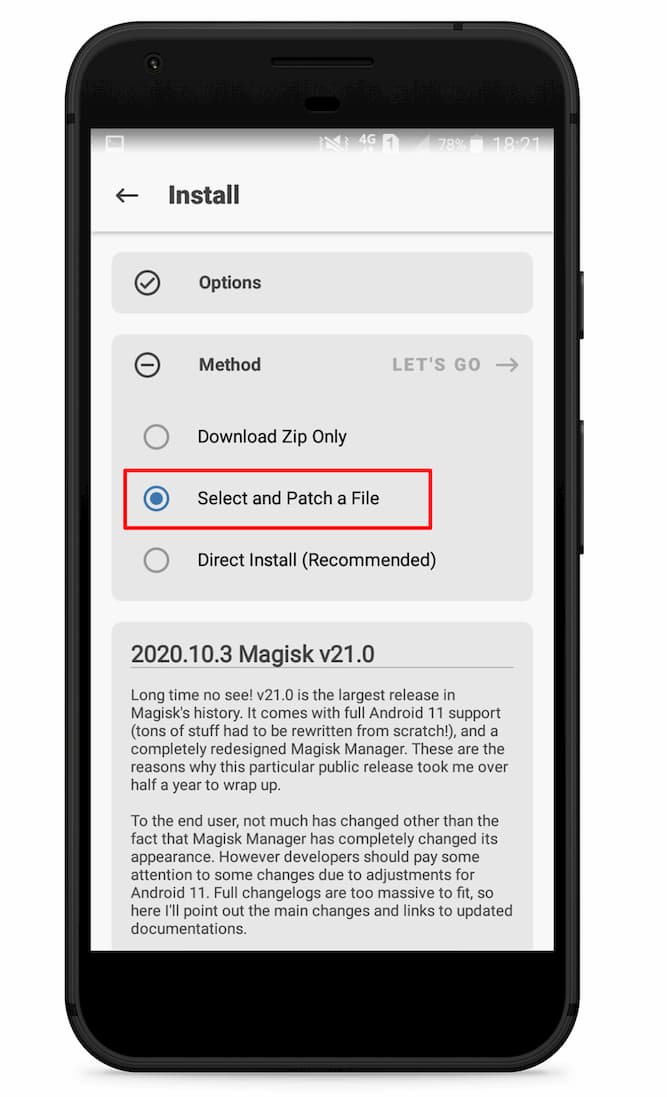
- Wait until Magisk patches the boot image. The patched file can be found in the Downloads folder.
- Rename
magisk_patched.imgtoboot.imgagain. - Now Copy that renamed
boot.imgto your PC/Laptop.
Step 4: Replace the phone’s current boot image with Magisk patched image
- Again return to the Command window and type the following command to boot OnePlus Nord CE into fastboot mode.
adb reboot bootloader
- Once the phone boots into fastboot mode, type the below command to flash our patched boot image file into your phone.
fastboot flash boot boot.img
- Next, once the flashing process completes, type the below command to Reboot your OnePlus Nord CE device.
fastboot reboot
- Open the Magisk App and check the Root status.
- You can also verify if your rooted OnePlus Nord CE passes SafetyNet by pressing the “Check SafetyNet” button in Magisk App.
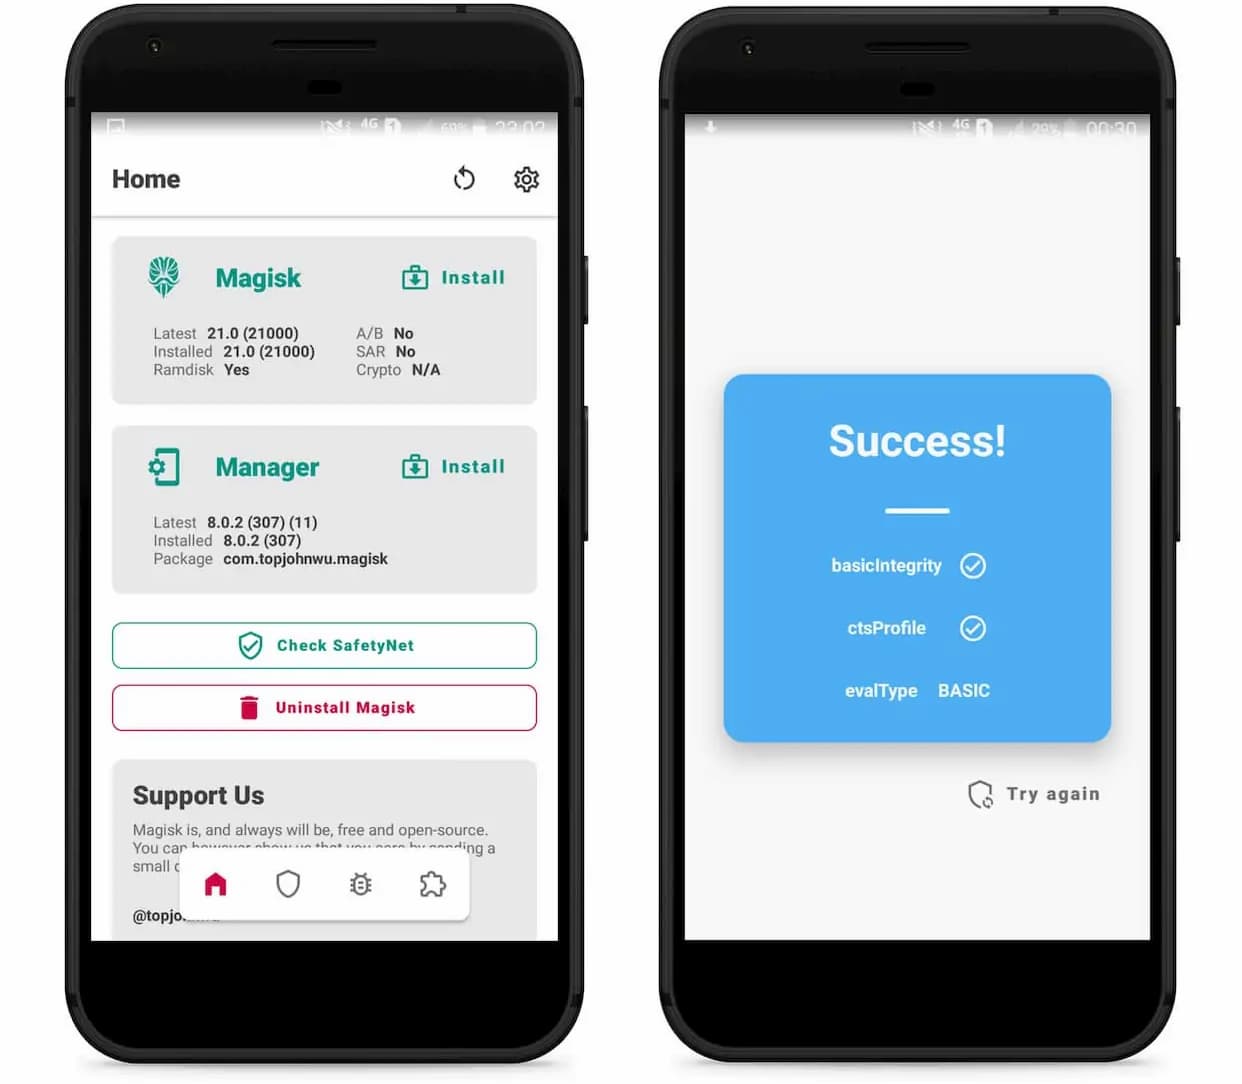
- That’s it. You have successfully Rooted your OnePlus Nord CE smartphone.
Now you can take full advantage of your android. You can install Root apps, Magisk Modules, and many more other customizations.
[su_box title=”Related Articles” box_color=”#01B09B” radius=”0″]
[/su_box]
Final Word
So this was all about how you can Unlock Bootloader on OnePlus Nord CE and simultaneously Root OnePlus Nord CE device using Magisk. For a clear understanding of the steps, we have attached screenshots. You can follow the steps along with the screenshots.
If you are getting any errors while implementing the steps, write about the issue in the comments. Then, we will reply with the solution.