Are you looking for a working guide to Root Asus ROG Phone 3 smartphone? If yes then this guide is for you. In this comprehensive guide, I have shown you a complete process to root this device.
If you are new to the rooting community then no worry! I will guide you on everything you need to know about rooting Asus ROG Phone 3. So, in order to root this device, we are going to use Magisk.
The reason behind using this method is because of its wide support to newer android versions and its very advance, as well as the safest way to root android.
As you might be knowing that for rooting an android phone, the very first step is to Unlock the bootloader. This will give us access to install custom recovery on our phone. TWRP recovery is the best for flashing files, so we will use that. And finally, we will Root Asus ROG Phone 3 using Magisk zip file.
About Asus ROG Phone 3
Asus is one of the top brands in the market of smartphones, laptops, and enormous different gaming products. It has collected immense fame because of manufacturing gigantic products. It had started the smartphone journey in 2014 with Asus Zenfone, and right now, it has manufactured a masterpiece ASUS ROG Phone III.
ROG Phones are basically manufactured for the gaming purpose since they contain beast processors inside for providing flawless gaming performance.
ASUS ROG 3 was launched on 23 July 2020 and sold most of its pieces in its first Flipkart flash sale. This phone comes with a brilliant screen size of 6.59 inch which is best for gaming and as well as an imposing front camera placement. Moreover, it contains an AMOLED capacitive touch screen with Corning Gorilla Glass 6, which beautifies it extremely.
As we already told that it’s majorly developed for gaming purposes, so the design of the ASUS ROG 3 phone is revealed in a way that you’ll observe the RGB lighting ROG symbol behind it. For enhancing your experience, ASUS has built ROG Gamecool cooling system fans which auto-cool device as per the temperature.
Excepting the performance, The ASUS ROG Phone 3 also consists of a high-class camera. This smartphone comes with the triple-camera setup having the 64 MP rear camera and as well as 13 MP + 5 MP for ultra-wide-angle, and for the selfie lovers, ASUS has placed a sharper 24 MP 1080p camera that will amaze you.
Considering the battery is the most significant part while playing high graphics games, and for extensive entertainment, that’s why the ASUS ROG Phone 3 offers you a 6000 mAH phone battery which can get fastly charged by the 30W ROG Hypercharge support. There are two variants of ASUS ROG 3 launched in India’s market – 8GB/128GB and 12GB/256GB which both worth 49,999 INR and 57,999 INR respectively.
Guide to Root Asus ROG Phone 3 Using Magisk
This guide has everything you need to Root Asus ROG Phone 3. You don’t have to follow different articles for Unlocking the bootloader.

So, follow the guide until the end and make sure to apply all the steps carefully.
Pre-Requirements
- You need a PC/Laptop to execute the ADB command.
- This process will wipe all your data. So, take complete Backup of android.
- Charge your phone up to 75% or more.
- Asus ROG Phone 3 Original USB Cable
Note: Rooting is a complex process, so if you miss any of the below steps will end up bricking your device. So, make sure to follow all the steps carefully as shown.
We are not responsible for any loss and damage to your device. Apply the below steps with your own risk.
Unlock Bootloader On Asus ROG Phone 3
You can follow the below steps to Unlock Bootloader on Asus ROG Phone 3.
Note: Unlocking the bootloader of your phone will erase all your android data. So, make sure to take full backup of your ROG Phone 3 smartphone.
- Go to Settings → System → About Phone → Check your Software version.
- Now you have to Download the Bootloader Unlock tool app.
- Install the app. (Make sure to enable the “Unknown Sources” option.)
- Open the app and agree with all Terms & Conditions.
- Scroll down and Again press “Agree”.
- Tap on the “PRESS TO UNLOCK YOUR BOOTLOADER” button.
- After that, your device will Restart and your Asus ROG Phone 3 bootloader will be unlocked.
Root Asus ROG Phone 3 With Magisk (Without TWRP)
Note: This stock boot.img is only for Version (WW-17.0823.2007.25). If you have updated your android version or if it is different then do let me know in the comments I will provide you stock boot.img for your current android version.
- First, check for your current android version.
- Go to Settings → System → About phone and check your current os version under “Software information”.
- If the version matches then you can proceed further.
- Enable “Developer options”.
- Go to Settings → System → About Phone → Software information
- Tap on Build number 7-8 time until you see a toast message “You’re a developer now”.
- Now under “System”, you will see the Developer options.
- Tap on “Developer options” and enable the “USB Debugging” option.
- Download boot.img file (only for version WW-17.0823.2007.25)
- Next, download Magisk Manager APK file on your Asus ROG Phone 3 device.
- Install it. (Make sure to enable the “Unknown Sources” option.)
- Open the Magisk Manager app and tap on “Install”.
- Again tap on “Install” then tap on the “Select and Patch a File” option.
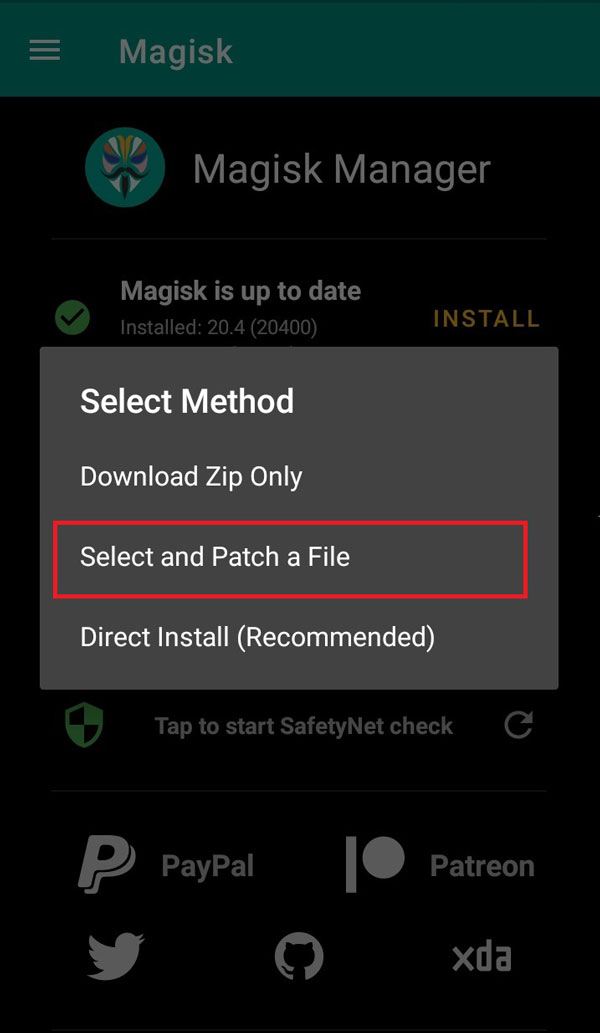
- Select the boot.img file that you have already downloaded.
- Now magisk_patched.img file will be exported in the Downloads folder.
Things to do on your PC/Laptop
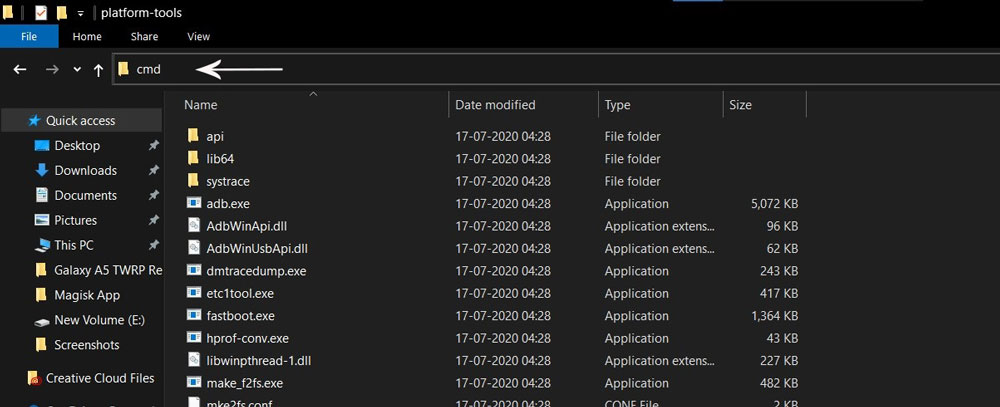
- Download SDK Platform tool and Extract it to your desktop.
- Now, copy and paste your magisk_patched.img file to the Platform-tools folder.
- After that rename magisk_patched.img file to boot.img.
- Connect your Asus ROG Phone 3 to PC in fastboot mode. Here is how you can boot ROG Phone 3 into fastboot mode.
- Switch off your phone.
- Press and hold the Volume Up + Power button for a short while.
- After that, you will see the fastboot mode screen.
- On the Platform-tools folder, type “cmd” in the address bar and hit Enter.
- Command window/PowerShell will open.
- Now type the following command and hit Enter.
fastboot devices
- After that type the below command and hit Enter.
fastboot flash boot boot.img
- Next, type the below command to Reboot your device.
fastboot reboot
- Congrats! you have successfully Rooted your ROG Phone 3 smartphone.
How to Verify Root?
- Once your phone boots up you can open the Magisk Manager app and check if you can see all green checkmarks.
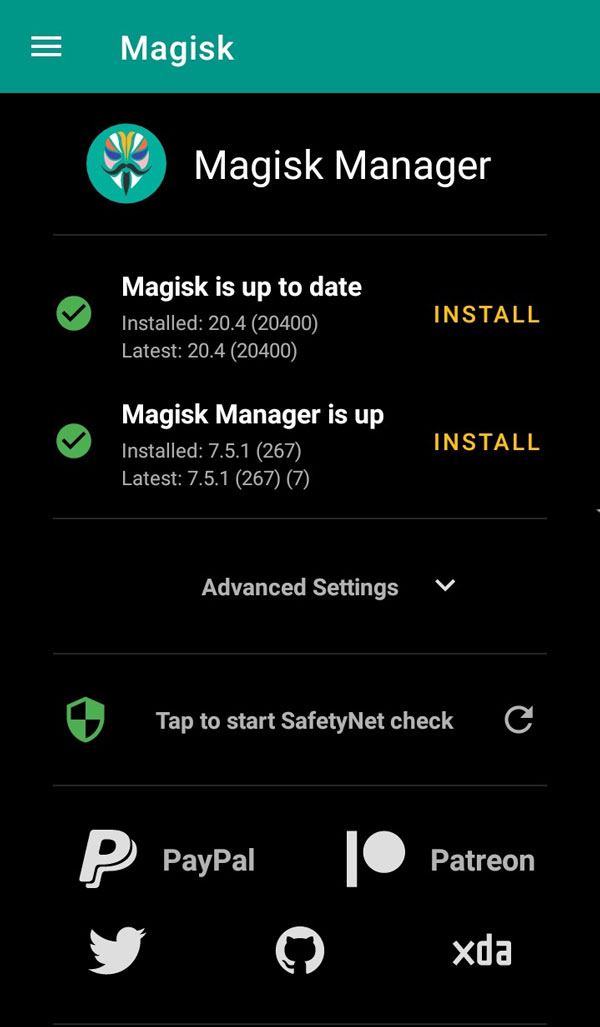
- If you can see all green checkmarks that means your phone is rooted successfully.
Conclusion –
In this comprehensive guide, we have shown you complete steps to Root Asus ROG Phone 3 using Magisk. We have also covered all the steps required to Unlock Bootloader on Asus ROG Phone 3.
I hope you find this guide helpful, if you like then make sure to share this guide with ROG Phone 3 users who are looking to root this device. Also, if you are stuck at any steps then you can clear your doubts in the comments.
See you in the next guide! Happy Rooting
Hi,
Im on version WW_17.0823.2008.78
can you provide me the boot.img
thanks in advance
Currently, it’s not available. Once I got the stock ROM I will extract the boot.img file and give you the download link here.
my asus is ww_0822.2005.11
Check your email.
Please provide me the boot.img file
17.0822.2005.11 give me the file too
Check your mail.
Already done!
Hi … First of all, thank you because I was able to easily root the phone, but my problem is: I changed the phone to Global ROM and rooted it with Magisk just so that I could do the update, but unfortunately after downloading the ROM I copy the file in the file manager and then restart it, it says system update failed ….. What do you think I should do?
Glad to hear that. The best solution is to revert back to Stock ROM.
hey i am on latest version can u provide me the boot image ?
Yes please provide your current OS version detail.
Hi, I am updated to WW ….. 2012.131can u please provided the updated files.
Thanks for your effort and support.
Your question is not clear. Can you please tell me your current OS version?
current OS is android 10 ASUS ROG 3 Indian and firmware is currently WW_17.0823.2012. b131… i have twrp installed can you tell me what to do now ? how do i install magisk den .?
and if i am on new how can i downgrade and will i be able to update my fw to new versions in future ?
Your question seems to be unclear please ask again.
Kindly wait I am creating a new page where I will list all the stock boot images of the Asus ROG Phone 3 smartphones in all regions. I will update the link here once the page is complete.
My current Os is android 10 and firmware version 17.0823.2012.131..and plz tell me if u dont have the boot img of this as i have currently installed TWRP. so should i downgrade..how?
kindly provide me for WW_17.0823.2102.143
Very much thanks in advance
Android os 10
Ok
I have sent you an email please check.
My mobile software is 17.0823.2012.131 give me boot image this version sir
Sure please check your email.
Sir my asus rog phone 3 model number is ww_17.0823.2102.143 os Android 10
Please wait we are updating the article.
Please sir 😭 provide ROG 3 Root need file Version W_17.0823.2102.143
i reaquest personally please Argent need sir
Please check your mail. I have already sent the boot image file.
Hello, can I please get W_17.0823.2102.143 Android 10? It would be much appreciated, thank you.
Hi Josh, it’s difficult to extract a boot image for every build version of your current Stock ROM. I will suggest you do it by yourself.
Hi mine is
WW_17.0823.2007.32
I need boot.img
Thank you in advance
File sent to your mail.
sir my Asus ROG 3 is 17.0823.2012.131 please give me the boot image for this version Thank you
My ROG 3 is on version WW_17.0823.2102.143, Android 10. Any chance I could get the *.img for it?
Can I find boot image for 17.0823.2104.147
yes sure
sir my Asus ROG 3 is WW_17.0823.2104.147 please give me the boot image for this version Thank you
I have sent the boot image file to your mail please check.
Hi, I have WW_17.0822.2005.11
Can you please share boot.img?
Yes why not
Hi,
My ROG 3 is WW_17.0823.2104.147, andriod 10. Any boot img available.
Thanks alot
Yes, I have sent the boot image file to your mail.
My asus Is We 17.0823.2104.147
Pls send me boot file
I am on android 11 can I have the boot file mailed to mirzasarim786@gmail.com please
Hi
My rog3 is
WW_17.0823.2007.32
Android 10
Does Boot image available?
Thank you in advance
thilaxshan24@gmail.com